Xlsx recipe
table of contents
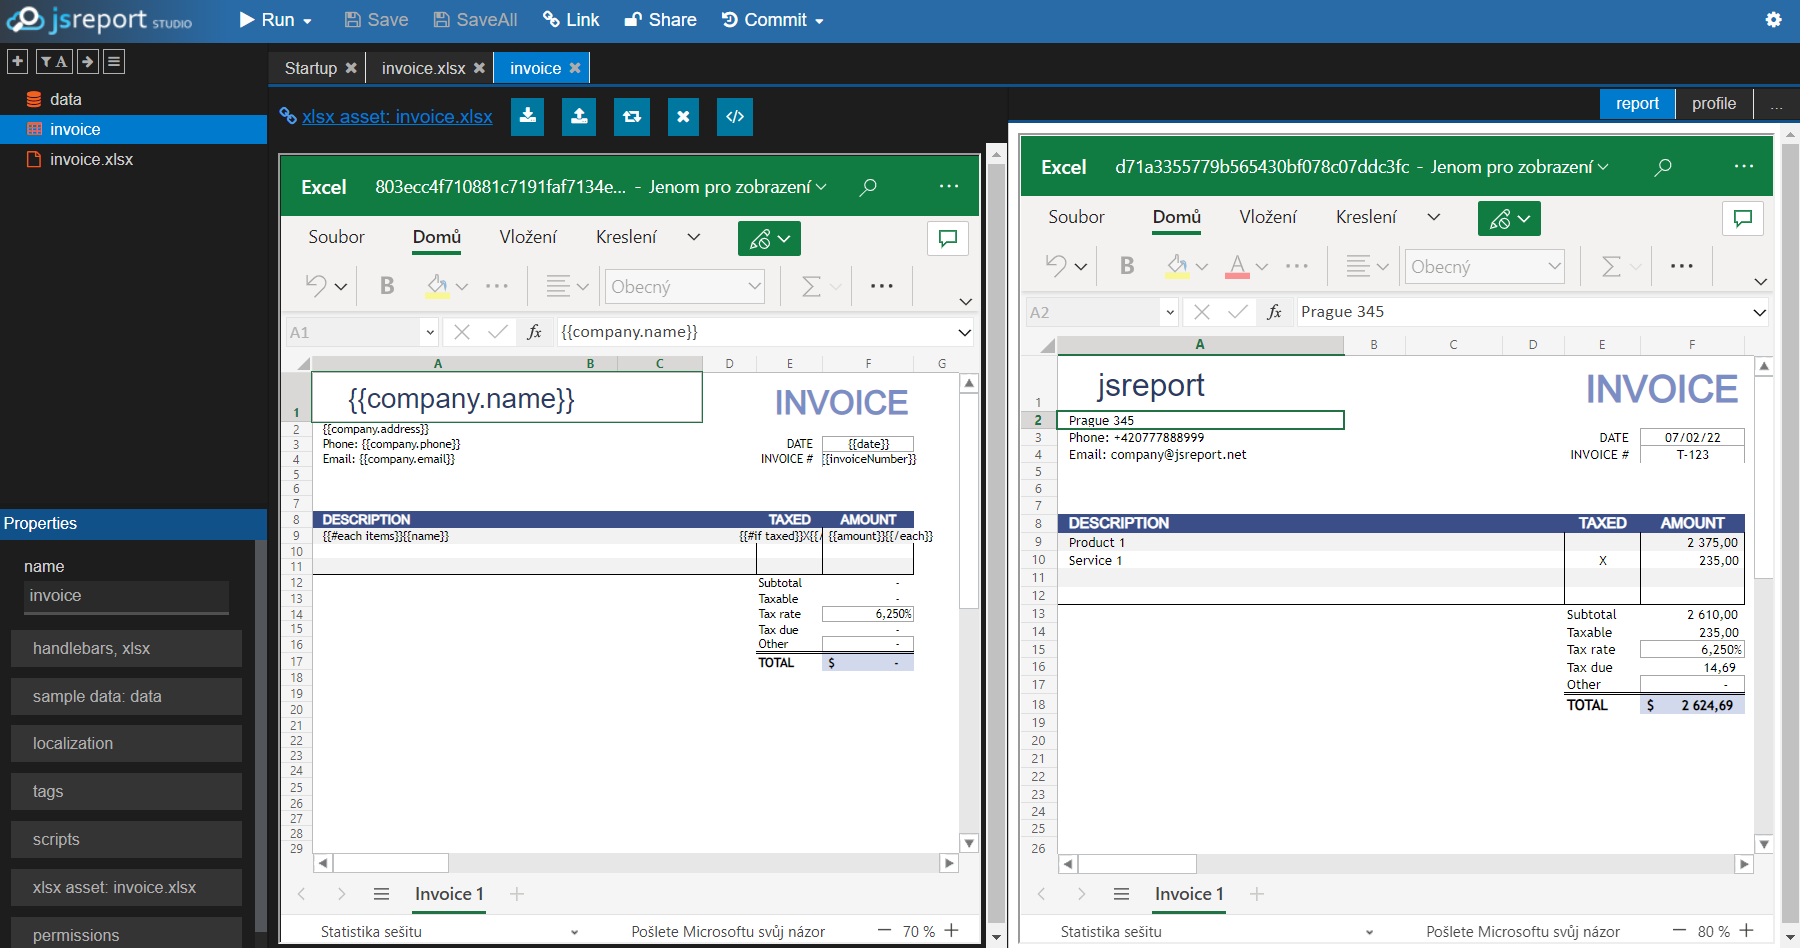
xlsx recipe generates excel xlsx reports based on the uploaded xlsx template with handlebars tags filled inside using Excel application.
- Open Excel and create xlsx file using handlebars templating engine.
- Upload created xlsx file as an asset to the jsreport studio
- Create template, select xlsx recipe and link the previously uploaded asset
- Attach sample input data or scripts if needed
- Run the template, you get back dynamically assembled xlsx report
Considerations
If you use these special characters (", ', <, >, &) directly in your document and you plan to use them as part of some parameter
for a handlebars helper, please be aware that what you may receive in the handlebars helper as parameter may be the xml/html encoded version of the character.
example:
somewhere in your .xlsx file
data
{
    "data": "Day & Night"
}
helpers
function isEqual (a, b) {
    // what you may receive in "b" parameter may be an xml/html escaped
    // version of the string "Day & Night" which is "Day & Night".
    // so the logic bellow will return false if you don't unescape the
    // value. please always ensure to unescape a literal value you pass
    // from the document
    return a === b
}
Basics
There are two steps that are executed for generating xlsx. The first phase is used for generating basic xlsx reports. We call it generation. The second phase, we call transformation, can be used to modify the xlsx file source described in Office Open XML SpreadsheetML at the lower level. The transformation requires deeper understanding of the xlsx format but is irreplaceable when you need to do advanced things.
Generation
The
xlsxrecipe originally implemented just the second phase while this generation phase is very new. The second phase is very stable with the same API running for years. The generation phase API can be unstable and maybe changed in the future.
The principle is simple and works the same in other office based recipes like docx and pptx. You simply type using Excel application to the cells handlebars tags like
{{someVariableToReplace}} |
The recipe transforms these tags using the handlebars engine and produces output xlsx with filled data. Using this approach, you can create dynamic tables with auto determined cell data types and formulas. Using the supported built-in helpers, you can even create charts.
Loop
{{#each numbers}}{{this}} |
{{/each}} |
Vertical Loop (beta)
| Name | {{#each items vertical=true}}{{name}} |
| Lastname | {{lastname}} |
| Age | {{age}}{{/each}} |
Dynamic Cells
{{#each cells=items}}{{this}}{{/each}} |
with data
{
  "items": [
    ["Name", "Lastname", "Score"],
    ["Boris", "Matos", 50]
    ["Alexander", "Smith", 32],
    ["John", "Doe", 25]
  ]
}
will generate the following cells
| Name | Lastname | Score |
|---|---|---|
| Boris | Matos | 50 |
| Alexander | Smith | 32 |
| John | Doe | 25 |
You can also use the following Handlebars data variables inside the loop for dynamic cells:
@first- abooleanthat will betruefor the first row being generated@last- abooleanthat will betruefor the last row being generated@rowIndex- anumberthat will contain the current row index being generated, starting from 0@firstColumn- abooleanthat will betruefor the first column in the row being generated@lastColumn- abooleanthat will betruefor the last column in the row being generated@columnIndex- anumberthat will contain the current column index in the row being generated, starting from 0
Hint: Speed up your template development with the same trick you can use for docx
Examples generation
Built-in generation helpers
xlsxCType
By default, when a cell only contains a handlebars tag/expression, the return value of the Handlebars tag/expression will be used to determine the cell type. If the value is a number, the cell type will be set to a number, if it is a boolean, the cell type will be set to boolean, and so on. However, there may be cases when controlling the exact cell type is needed, for this cases you can use the xlsxCType helper.
The xlsxCType expects the t parameter to be set, it accepts one of the following values:
s- the cell type will be set to stringb- the cell type will be set to booleann- the cell type will be set to number
Usage: You just need to call this helper anywhere in the cell, whatever value the cell ends containing in the output will be treated as the type specified by the t parameter.
{{xlsxCType t="n"}}{{value}}
xlsxChart
Create a chart inside the desktop Excl application and use xlsxChart helper call inside the chart title.
The helper call in a title can look like this:
A title{{xlsxChart data=fruits}}
With the following data on the input:
{
    "fruits": {
        "labels": ["Q1", "Q2", "Q3", "Q4"],
        "datasets": [{
            "label": "Apples",
            "data": [100,50,10,70]
        }, {
            "label": "Oranges",
            "data": [20,30,20,40]
        }]
    }
}
The data.labels describes labels on the X axis. The data.datasets includes values for the Y axis.
Each dataset need to contain a label, and the data associated with it, additionally (only for scatterChart type) it can also define some labels for each specific unit of data (dataLabels)
{
    "fruits": {
        "labels": ["Q1", "Q2", "Q3", "Q4"],
        "datasets": [{
            "label": "Apples",
            "data": [100,50,10,70],
            "dataLabels": [
                "Full",
                "Medium",
                "Low",
                {
                    "value": "Medium",
                    // possible values are: "left", "right", "center", "top", "bottom"
                    "position": "left"
                }
            ]
        }, {
            "label": "Oranges",
            "data": [20,30,20,40]
        }]
    }
}
You can also pass some options to the chart that control the way the chart display, limit the information.
{{xlsxChart data=fruits options=options}}
the supported options are:
- scales (
object) -> Options to control the display of the chart axis- scales.xAxes (
array) -> Options to control the display of the x axes - scales.yAxes (
array) -> Options to control the display of the y axes Axis options- display (
boolean) -> wheter to show or hide the axis - ticks.stepSize (
number) -> the step size to use to separate the axis's ticks - ticks.min (
number) -> the min value to show in the axis's ticks - ticks.max (
number) -> the max value to show in the axis's ticks
- display (
- scales.xAxes (
// example options
{
    "scales": {
        "xAxes": [{
              "display": true,
              "ticks": {
                  "stepSize": 2,
                  "min": 1,
                  "max": 15
              }
        }]
    }
}
xlsxColAutofit
When you double click a column's right border in desktop excel, it automatically fits the width of the cells to the widest content. The same thing can be achieven using the xlsxColAutofit helper. The helper call {{xlsxColAutofit}} needs to be placed to the first cell's note of the column you want to autofit. The note is Excel feature you can find in the section "Revision" and "Notes" or "Comments". In case you want to autofit all columns, you can place to the first cell call {{xlsxColAutofit all=true}}.
Custom helpers
You can implement also your own custom helpers and use them in the word templates. The helpers section can be toggled in the studio using the "show helpers" button.
Child templates
The recipe doesn't support using child templates or assets to insert another xlsx file into one template. Both can be used just to insert text.
Transformation
Excel files are defined by several xml files zipped into one with xlsx extension. This recipe employs templating engine to directly modify these source files and produces excel files.
The excel source xml follows up quite verbose and complicated Office Open XML SpreadsheetML File Format specification and it would be difficult to create one from the scratch. That's why the recipe rather replaces or adds just particular pieces to particular places.
The modification of source XML is used by several predefined helpers the recipe provides. There is for example helper xlsxAdd which adds piece of xml into particular file and its particular path. The following code is the most simple example using handlebars for creating excel with one row and cell.
{{#xlsxAdd "xl/worksheets/sheet1.xml" "worksheet.sheetData[0].row"}}
    <row>
        <c t="inlineStr"><is><t>Hello world</t></is></c>
    </row>
{{/xlsxAdd}}

{{{xlsxPrint}}}
The parameter xl/worksheets/sheet1.xml is the physical path to the file representing the sheet. You can always verify the path by unzipping the xlsx file and observing its content. The parameter worksheet.sheetData[0].row is then javascript based path into the particular xml. We use here javascript instead of XPath because we anyway keep in memory javascript representation of xml because it is more practical. Check this helper if you are not sure how is the xml path constructed. Finally the value inside the xlsxAdd helper is xml which is added.
At the end of the template, there always must be called helper xlsxPrint which prints the internal json representation into xml which is by recipe zipped into xlsx.
Using other provided helper you should be able to manipulate the source xml into every desired shape.
Unfortunately Office Open XML SpreadsheetML File Format is not very well documented and quite hard to handle, but you can look here for a general overview of what tags and attributes are supported. When you are lost, it is always good idea to create a test xlsx file in excel, unzip it and analyze its content. Another approach we recommend is to create the whole excel the first, upload it into jsreport and then only replace its data, which is simple.
Examples transformation
- Add row
- Using xlsxMerge to rename sheet
- Log and debug
- Conditional formatting
- Merged cells
- Add sheet
- Add multiple sheets
- Clone sheet
- Pivot table tutorial
- Chart
- Table
- Update cell
- Formulas
- Recalculate formulas
- Freeze rows
Built-in transformation helpers
xlsxPrint
The must be the call to xlsxPrint at the end of every template.
xlsxReplace
{{#xlsxReplace filePath xmlPath}}...{{/xlsxReplace}}
Replace the whole xml in filePath and xmlPath with the xml produced by the block helper.
xlsxMerge
{{#xlsxMerge filePath xmlPath}}...{{/xlsxMerge}}
Merges the xml in filePath at xmlPath with content generated by block helper.
Hint -> you can calculate the xmlPath string dynamically using handlebars subexpressions.
{{#each  items}}
{{#xlsxMerge  "xl/worksheets/sheet1.xml"  (replace  "worksheet.sheetData[0].row[@value].c[0]"  "@value"  @index)}}
<c  t="inlineStr"><is><t>{{this}}</t></is></c>
{{/xlsxMerge}}
{{/each}}
function replace(str, pattern, value)  {
  return str.replace(pattern, value)
}
xlsxAdd
{{#xlsxAdd filePath xmlPath}}...{{/xlsxAdd }}
Add xml provided by block helper into filePath and collection found at xmlPath.
xlsxRemove
{{#xlsxRemove filePath xmlPath index}}...{{/xlsxRemove }}
Remove element from collection in filePath at xmlPath at index.
xlsxAddImage
{{#xlsxAddImage "test" "sheet1.xml" 0 0 1 1}}
{{asset "myImage.png" "base64"}}
{{/xlsxAddImage}}
Add an base64 encoded image provided by the block helper content into the sheet cell. Arguments are imageNameOrOptions, sheet id, column from, row from, column to, row to.
Only the png images are supported.
When imageNameOrOptions argument is object, it can contain the following properties:
name- name of the imagealtText- alternative text for the image (used for accessibility)
custom
You can always write your custom helpers. The best is to get started by checking the source of the standard ones
Troubleshooting
The common problem is that excel signals the file is corrupted and offers it will fix it. There are two options in this case.
You can let excel fix the file, save it and decompress it. Then compare the source xmls with the corrupted one and find out what to do to fix your code. This takes time but should lead to the identification of the problem.
The second approach is problem isolation. Try to remove code block by block and identify the minimal part causing the problem. Now you can either let excel fix it and use the first approach, but you most likely get to the problem source just by isolating it.
Preview in studio
See general documentation for office preview in studio here.
API
You can specifty template the standard way using name/shortid or you can also send it fully in the API call:
{
  "template":  {
    "recipe":  "xlsx",
    "engine":  "handlebars",
    "content": "{{{xlsxPrint}}}",
    "xlsx":  {
      "templateAssetShortid":  "xxxx"
    }
  },
  "data":  {}
}
In case you don't have the xlsx template stored as an asset you can send it directly in the API call.
{
  "template":  {
    "recipe":  "xlsx",
    "engine":  "handlebars",
    "content": "{{{xlsxPrint}}}",
    "xlsx":  {
      "templateAsset":  {
        "content": "base64 encoded word file",
        "encoding":"base64"
       }
    }
  },
  "data":  {}
}
Configuration
"extensions": {
"xlsx": {
// default is to escape & into &amp;
"escapeAmp": true,
// recipe stops parsing xlsxAdd output into json after the following is reached
"numberOfParsedAddIterations": 50,
// huge reports are flushed into buffered files with the following size
"addBufferSize": 50000000,
}
}