Getting started
table of contents
jsreport is an open-source reporting server-side tool running cross-platform on node.js. It can dynamically produce reports in various formats like pdf, excel, docx, pptx and also many other text based formats. The main idea of jsreport is to let users define reports without annoying designers but instead by using code, mostly html and javascript templating engines. This approach gives great power and flexibility to the software developers and lets them use the knowledge they already have.
This article shows you the most simple use case with jsreport, which is creating a pdf invoice. It covers the basic principles you need to understand to get started.
Basic workflow
- Get jsreport
- Define report template
- Test and preview report
- Call API with real input data
Get jsreport
First, you need to download and install jsreport on your PC, register for jsreport as a service solution, or start right away in jsreport playground.
No matter which option you choose, you get access to the jsreport browser-based studio you're going to need for designing and testing reports in this tutorial.
Create a report template
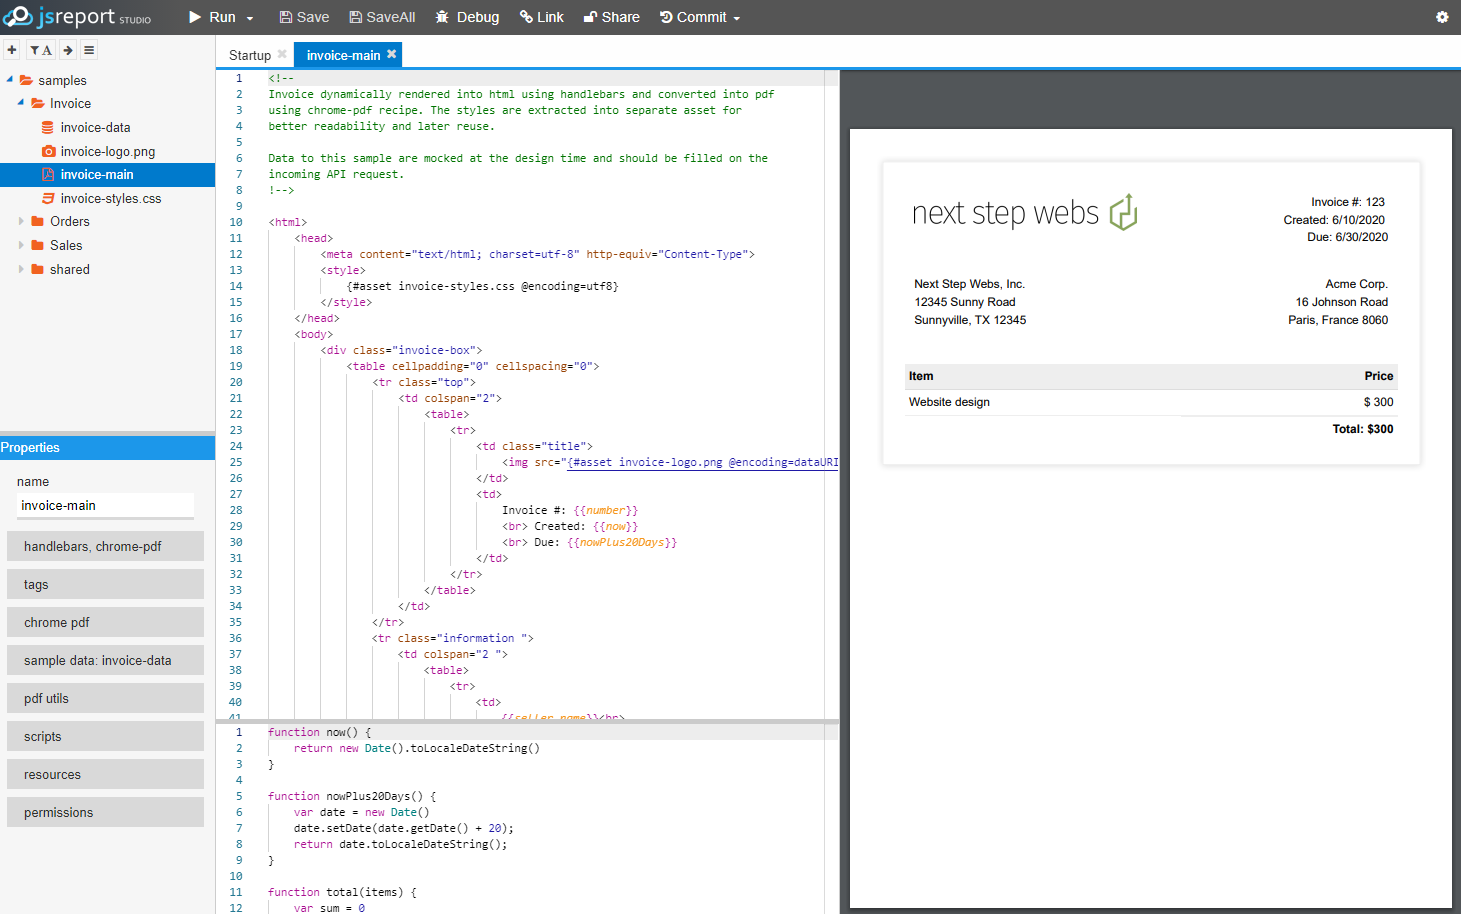
Together with the rendering process, the report template is the heart of the jsreport. A template defines what the report is going to look like and is used together with the input data every time you render a new report.
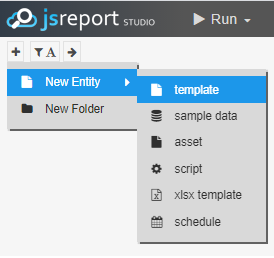
To create a report template use the "plus" button in the left entity tree panel -> new entity -> template.
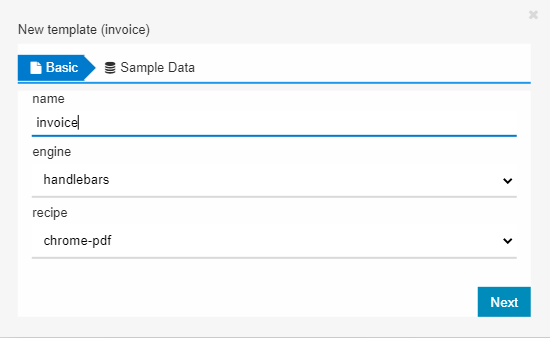
The template creation wizard pops up and helps to define the report template. The first wizard step asks for the template name and templating engine and recipe. Let's fill just a name and keep the other defaults which will be discussed later.
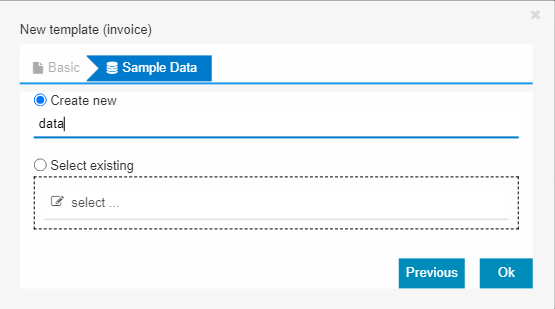
In the second wizard step, let's fill a name for the entity we will use for report input data.
Render the report
Now you can try to fill in the template content with some simple html and hit the "Run" button.
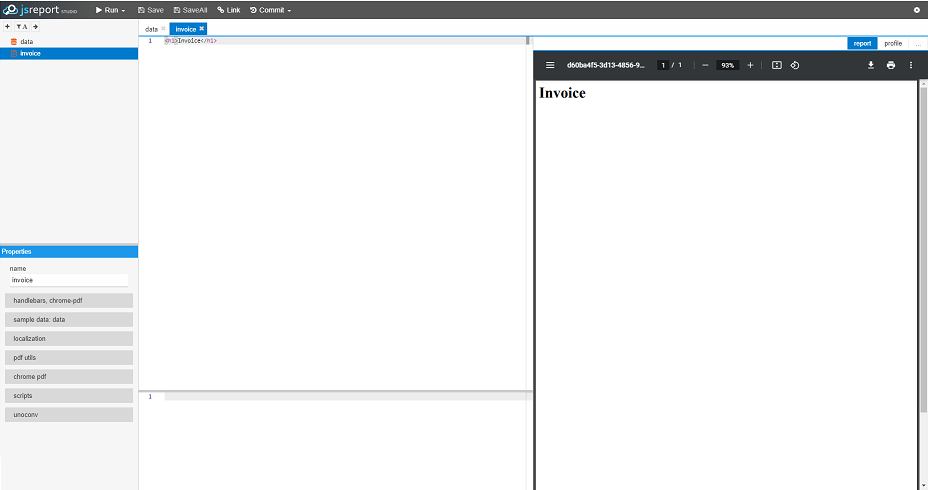
Tip: You can use also the F8 shortcut to preview the template. Or you can click
Run->Run and undock previewbutton to render into a new tab. Then you can move this tab to the second screen of your PC and comfortably develop on two of them.
Recipes
The report output format is defined by the template's recipe. The recipe is an algorithm used by jsreport to convert the output of templating engines into the desired format. Every report template needs to specify exactly one recipe from all that are available.
The easiest way to create a pdf invoice is to use html to pdf conversion implemented in the chrome-pdf recipe, so let's stay with it.

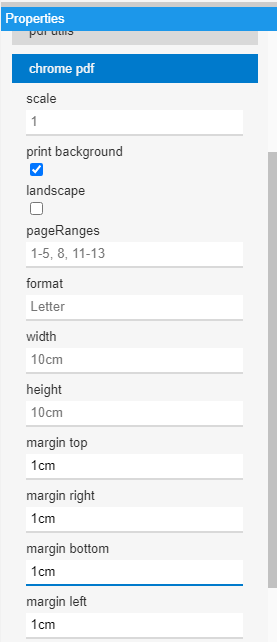
Every recipe typically provides additional options which can be filled in the left properties menu. In this case, you can use chrome-pdf margin options, and better position the invoice content.
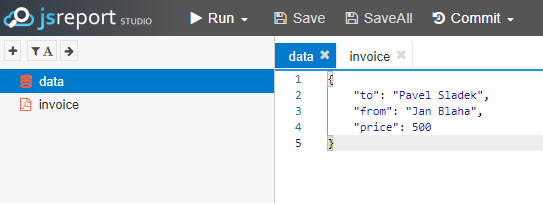
Define sample data
The template creation wizard already prepared an extra entity we will use to fill the report input data used during report preview.
The sample data needs to be defined in json format and for our simple invoice it can contain the following:
Templating engines
Templates are defined using common javascript templating engines like jsrender or handlebars. Templating engines let you assemble reports dynamically using loops, conditions, javascript helpers, or data binding. Templating engines provide you with a way to define any custom report you like.
Each template can use a different templating engine, and it's up to you which you will choose. They have a very similar feature scope and only use different syntax, but everyone has different preferences.
This time, let's use handlebars and assemble the invoice html. In a very simple way it can have the following look:
<h1> Invoice </h1>
<div>
    <span>from: {{from}}</span>
</div>
<div>
    <span>to: {{to}}</span>
</div>
<div>
    <span>price: {{price}}$</span>
</div>
To make it a little bit more complex, let's add a tax calculation to the template. To do so, you will need to define a custom javascript function calculating tax from the original price. Such a function can be added to the bottom panel in jsreport studio:
function tax(price) {
    return Math.round(price * 0.19);
}
Then back in the top panel you can use the tax function to print the price.
<div>
    <span>tax: {{#tax price}}{{/tax}}$</span>
</div>
Assets
jsreport ships out of the box with several extensions you can find useful during the development. The most commonly used is the assets extension. This extension is typically used when you want to extract parts of the template like styles or scripts into separate entities and reuse them. Or when you want to upload images to jsreport and reference them in the template.
Let's add some CSS styles to the invoice using an asset. Right-click the entity tree panel -> new entity -> asset.
Name it for example styles.css.
Then fill in some css and save it:
h1 {
    color: red;
}
Tip: You can save the active entity using CTRL+s shortcut
Now you want to reference the asset inside the template and link the style. This can be done by calling templating engine helper asset(path, encoding = 'utf8'). Open the invoice template and add to the top the following code.
<style>
  {{asset "./styles.css"}}
</style>
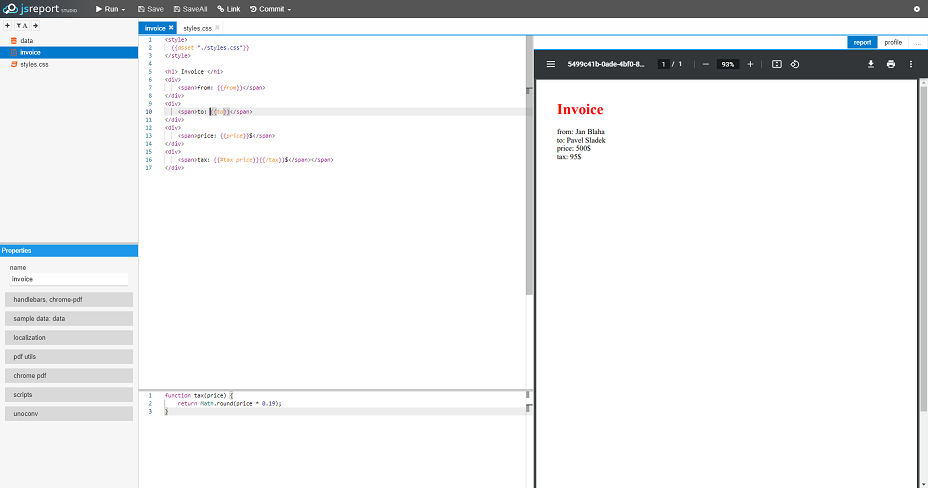
The asset helper call will find the asset and extracts its content. In this case, it is just plain text, but it can be also an image for example.
See asets extension documentation for the details.
Tip: You can also drag & drop any file to the entity tree and it gets automatically created as an asset entity.
Test and preview report
Now it's time to finish the invoice and preview it with the sample data until you are satisfied. In case you want to skip it and see the result right away, you can find it here in the playground.
Call API with real input data
Now you are ready to integrate your application with jsreport API. It's very simple and in most cases, you just need to do one REST call. You can even try it from your browser's REST plugin.
The following request will invoke rendering of the previously defined template and response back with a pdf stream:
POST:https://localhost/api/report
Headers: Content-Type: application/json
BODY:{ "template": { "name" : "invoice" }, "data" : { "to": "John Lennon", "from": "George Harrison", "price": 800 } }
More information about the jsreport API can be found here.
Further study
For further study, we recommend checking out the jsreport playground, which provides a built-in set of examples demonstrating most of the jsreport rendering capabilities. Then you can continue with the next tutorials and explore more advanced features.