Converting html to xlsx
table of contents
html-to-xlsx recipe generates Excel xslx files from HTML tables. This isn't a full HTML -> Excel conversion but a rather pragmatic and fast way to create Excel files from jsreport. The recipe reads input table and extract a couple of CSS style properties using a specific HTML engine (which defaults to chrome), and finally uses the styles to create the Excel cells.
Examples
- Basic table
- Cells with data types
- Cell with line break
- Cell with format
- Cell with formula
- Merged cells
- Multiple sheets
- Conversion JS trigger
- Insert output into xlsx template
- Postprocess using xlsx
The following CSS properties are supported:
background-color- cell background colorcolor- cell foreground colorborder- all theborder-[left|right|top|bottom]-width,border-[left|right|top|bottom]-style,border-[left|right|top|bottom]-colorwill be transformed into Excel cells borders.transform: rotate()- rotate text at certain angles to produce vertical text (only specific set of angles work to replicate what the xlsx format supports).text-align- text horizontal align in the Excel cellvertical-align- vertical align in the Excel cellwidth- the Excel column will get the highest width; it can be little bit inaccurate because of pixel to Excel points conversionheight- the Excel row will get the highest heightfont-family- font family, defaults toCalibrifont-size- font size, defaults to16pxfont-style-normal, anditalicstyles are supportedfont-weight- control whether the cell's text should be bold or nottext-decoration-underlineandline-throughare supportedoverflow- the Excel cell will have text wrap enabled if this is set to scroll.writing-mode,text-orientation- use a combination of these styles to produce different styles of vertical textwhite-space- to control how the white space characters are treated inside the cell
The following HTML attributes are supported:
colspan- numeric value that merges current column with columns to the rightrowspan- numeric value that merges current row with rows below.
Note: When using vertical text you need to set an explicit width and height if you want a predictable result. this is needed because taking dimensions from the document (either with browser based tools or cheerio) is unpredictable, the default dimensions when vertical text is used may change between versions.
Options
htmlEngine-String(supported values here depends on the HTML engines that you have available in your jsreport installation, by default justchromeis available but you can additionally install better performing cheerio as HTML engine too)waitForJS-Booleanwhether to wait for the JavaScript trigger to be enabled before trying to read the HTML tables on the page or not. defaults tofalse.insertToXlsxTemplate-Booleancontrols if the result of the HTML to Excel tables conversion should be added as new sheets of existing xlsx template, it needs you to set an xlsx template to work. Default isfalse.
Sheets
Each table detected on the HTML source is converted to a new sheet in the final xlsx file. The sheets names are by default Sheet1, Sheet2 etc. However, you can specify a custom sheet name using the name or data-sheet-name attribute on the table element where the data-sheet-name has precedence.
<table name="Data1">
    <tr>
        <td>1</td>
    </tr>
</table>
<table data-sheet-name="Data2">
    <tr>
        <td>2</td>
    </tr>
</table>
Cells with data types
To produce a cell with specific data type you need to use the data-cell-type on the td element. The supported data types are number, boolean, date, datetime and formula:
<table>
    <tr>
        <td data-cell-type="number">10</td>
        <td data-cell-type="boolean" style="width: 85px">1</td>
        <td data-cell-type="date">2019-01-22Z</td>
        <td data-cell-type="datetime">2025-02-12T20:57:28.597Z</td>
    </tr>
</table>
The datetime and date should be specified in ISO format with Z and in UTC. Otherwise Windows servers will parse it in local time.
Format
Excel supports setting cell string format. Add the following attributes to the td element:
data-cell-format-str-> Specify the raw string formatdata-cell-format-enum-> Select an existing format
Possible values of the data-cell-format-enum are:
0-> format equal togeneral1-> format equal to02-> format equal to0.003-> format equal to#,##04-> format equal to#,##0.009-> format equal to0%10-> format equal to0.00%11-> format equal to0.00e+0012-> format equal to# ?/?13-> format equal to# ??/??14-> format equal tomm-dd-yy15-> format equal tod-mmm-yy16-> format equal tod-mmm17-> format equal tommm-yy18-> format equal toh:mm am/pm19-> format equal toh:mm:ss am/pm20-> format equal toh:mm21-> format equal toh:mm:ss22-> format equal tom/d/yy h:mm37-> format equal to#,##0 ;(#,##0)38-> format equal to#,##0 ;[red](#,##0)39-> format equal to#,##0.00;(#,##0.00)40-> format equal to#,##0.00;[red](#,##0.00)41-> format equal to_(* #,##0_);_(* (#,##0);_(* "-"_);_(@_)42-> format equal to_("$"* #,##0_);_("$* (#,##0);_("$"* "-"_);_(@_)43-> format equal to_(* #,##0.00_);_(* (#,##0.00);_(* "-"??_);_(@_)44-> format equal to_("$"* #,##0.00_);_("$"* (#,##0.00);_("$"* "-"??_);_(@_)45-> format equal tomm:ss46-> format equal to[h]:mm:ss47-> format equal tommss.048-> format equal to##0.0e+049-> format equal to@
<style>
    td {
        width: 60px;
        padding: 5px;
    }
</style>
<table>
    <tr>
        <td data-cell-type="number" data-cell-format-str="0.00">10</td>
        <td data-cell-type="number" data-cell-format-enum="3">100000</td>
        <td data-cell-type="date" data-cell-format-str="m/d/yyy">2019-01-22Z</td>
    </tr>
</table>
Setting the format is also required when the cell needs to have a specific format category which depends on the computer locale. The cell is otherwise categorized by Excel as General.
For example, using data-cell-type="date" makes the cell a date and you can use it in the date-based calculations. However, the cell format category in Excel is displayed as General and not Date. To rectify this, you need to use data-cell-format-str to match your locale.
Formula
A formula cell can be specified using data-cell-type="formula" on the td element.
<table>
    <tr>
        <td data-cell-type="number">10</td>
        <td data-cell-type="number">10</td>
        <td data-cell-type="formula">=SUM(A1, B1)</td>
    </tr>
</table>
Font family
You can use the following CSS styles to change the default font-family for all cells in table.
td  {
  font-family: 'Verdana';
  font-size: 18px;
}
Insert output into xlsx template
You can use the following flow to produce a complex xlsx with charts or pivot tables.
- open your desktop Excel application and prepare a file with a chart on one sheet and static data on the second
- upload the xlsx to jsreport studio and link it with your
html-to-xlsxtemplate - generate
<table>but withnameattribute matching the existing sheet with data
See the example Chart with html-to-xlsx recipe
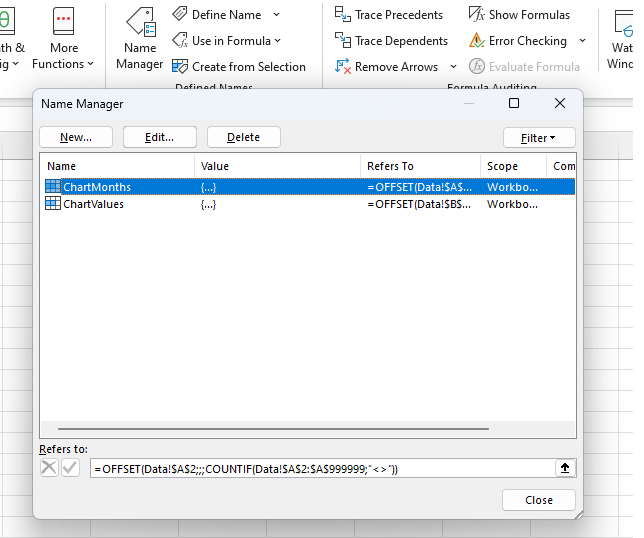
In this case, the data source for the chart is dynamic and needs to use a named formula. To define such a formula, use "Name Manager" in the "Formulas" ribbon.
=OFFSET(Data!$A$2;;;COUNTIF(Data!$A$2:$A$999999;"<>"))

This formula defines the range of non-empty cells starting A2 in column A .
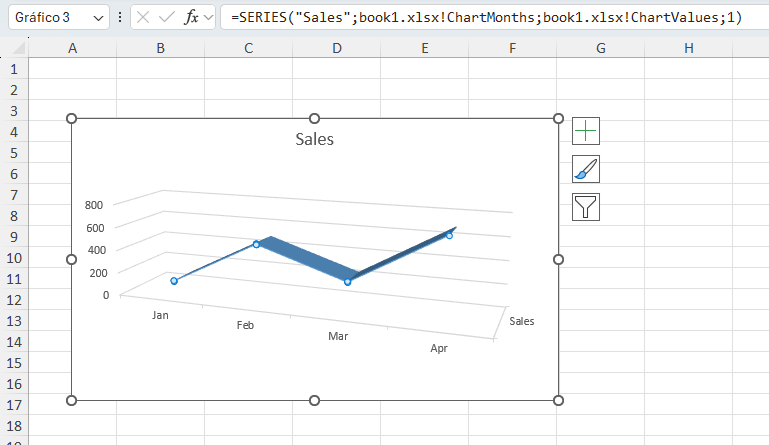
To apply this named formula, you click on the chart's series and in the Excel formula box update the SERIES function
=SERIES("Sales";book1.xlsx!ChartMonths;book1.xlsx!ChartValues;1)

Conversion triggers
You may need to postpone conversion of tables until some JavaScript async tasks are processed. If this is the case; set htmlToXlsx.waitForJS = true in the API options or Wait for conversion trigger in the studio menu. When set, the conversion won't start until you set window.JSREPORT_READY_TO_START = true inside your template's JavaScript.
...
<script>
    // do some calculations or something async
    setTimeout(function() {
        window.JSREPORT_READY_TO_START = true; //this will start the conversion and read the existing tables on the page
    }, 500);
    ...
</script>
Issues with row height being larger than actual the content
When using phantomjs as the engine there are cases when a row height ends with a larger height than the actual content. This is caused by a phantomjs bug that retrieves a larger height when the content of cells contains white space characters.
There are two possible workarounds:
- use
letter-spacingCSS property with some negative value (demo)
<!-- without "letter-spacing" the row would be more larger -->
<table style="letter-spacing: -4px">
    <tr>
        <td> From Date: N/A</td>
        <td> To Date: N/A </td>
        <td> Search Text: N/A </td>
        <td> Sort Order: N/A </td>
        <td> Sort Key: N/A </td>
        <td> Filter: N/A </td>
    </tr>
</table>
- use
line-height: 0with a specificheight(demo)
<!-- without "line-height" and "height" the row would be more larger -->
<table style="line-height: 0">
    <tr style="height: 20px">
        <td> From Date: N/A</td>
        <td> To Date: N/A </td>
        <td> Search Text: N/A </td>
        <td> Sort Order: N/A </td>
        <td> Sort Key: N/A </td>
        <td> Filter: N/A </td>
    </tr>
</table>
Performance
The chrome engine can have performance problems when evaluating huge tables with many cells. For these cases the recipe provides an additional helper which splits large tables into chunks and runs evaluation in batches. Usage is like each or jsrender for handlebar helpers.
<table>
    {{#htmlToXlsxEachRows people}}
      <tr>
        <td>{{name}}</td>
        <td>{{address}}</td>
      </tr>
    {{/htmlToXlsxEachRows}}
</table>
Cheerio HTML engine
Although the htmlToXlsxEachRows helper prevents Chrome from hanging, the rendering can still be slow. This is because Chrome needs to create DOM elements for the whole table and evaluate every single cell. Fortunately, there is a better option for large tables - using the custom HTML engine cheerio-page-eval.
This custom engine is experimental and requires manual installation through NPM.
npm i cheerio-page-eval
restart jsreport
Afterward, you can select it in the studio HTML to xlsx menu and start using it. This engine doesn't create DOM representation like Chrome, so it has much better performance. However, the lack of DOM also introduces some limitations.
- The cheerio engine doesn't support global CSS styles in the
<style>tag. You need to use in-line styles on cells. - Since there is no DOM, the whitespace is not normalized and styles that affect it does not have any effect (like
white-space), cheerio will take the whitespace present in the source html as it is. - It also doesn't evaluate JavaScript in the
<script>tags. The helpers and templating engines aren't limited.
htmlToXlsxEachRows helper also works with the cheerio engine and can significantly improve rendering memory footprint on long tables.
Preview in studio
See general documentation for office preview in studio here.
Postprocess using xlsx recipe
The html-to-xlsx will be always limited and you may miss some features that aren't yet implemented in it. In this case you can use xlsx recipe and postprocess the html-to-xlsx and modify what you need using low level xlsx helpers.
API
You can specify the template the standard way by using name or shortid, or alternatively you can also send it in the API request. If you have the Excel template stored as an asset you can also reference it in the request.
{
  "template":  {
    "recipe":  "html-to-xlsx",
    "engine":  "handlebars",
    "content": "<table></table>",
    "htmlToXlsx":  {
      "templateAssetShortid":  "xxxx"
    }
  },
  "data":  {}
}
If you don't have the xlsx template stored as an asset you can send it directly in the API request.
{
  "template":  {
    "recipe":  "html-to-xlsx",
    "engine":  "handlebars",
    "content": "<table></table>",
    "htmlToXlsx":  {
      "templateAsset":  {
        "content": "base64 encoded word file",
        "encoding":"base64"
       }
    }
  },
  "data":  {}
}