Pdf utils
table of contents
parse(sourcePdfBuf, includeText = false)prepend(sourcePdfBuf, prependedPdfBuf, options)append(sourcePdfBuf, appendedPdfBuf, options)merge(sourcePdfBuf, extraPdfBuf, options)addAttachment(sourcePdfBuf, attachmentBuf, options)outlines(sourcePdfBuf, outlines)removePages(sourcePdfBuf, pageNumbers)postprocess(sourcePdfBuf, { pdfMeta, pdfPassword, pdfSign, outlines } = {})Encrypt pdf with password, sign pdf with a certificate, fill output pdf meta, dynamically merge or concatenate multiple pdf templates into one output pdf.
Examples
- Merge header and footer with page numbers
- Merge watermark
- Mixed pages orientation
- Merge with groups
- Merge with groups (jsrender)
- Merge dynamic header with items
- Merge dynamic header with items (jsrender)
- TOC - render twice
- TOC - merge
- Manual operations inside script
- Page numbers relative to the groups
- Merge with render for every page enabled
- Merge to the bottom of the last page
Basics
jsreport extension which can merge or concatenate multiple pdf templates into a single output. The merge functionality can be used to add a dynamic header based on the content of a particular page or even a table of contents. The join can be used to prepend a cover to the pdf or to change page orientation dynamically through the single report. These advanced functions are provided on the top of standard pdf recipes and fill the gap to reach fully dynamic and unlimited pdf outputs.
The pdf manipulations are configured using the studio, respectively individual template menu. The main part of this extension is the pdf merge and append operations, but the extension can also encrypt pdf, sign it with a certificate or fill basic pdf metadata. This document covers the pdf merge/append operations at the beginning and the rest at the very end.
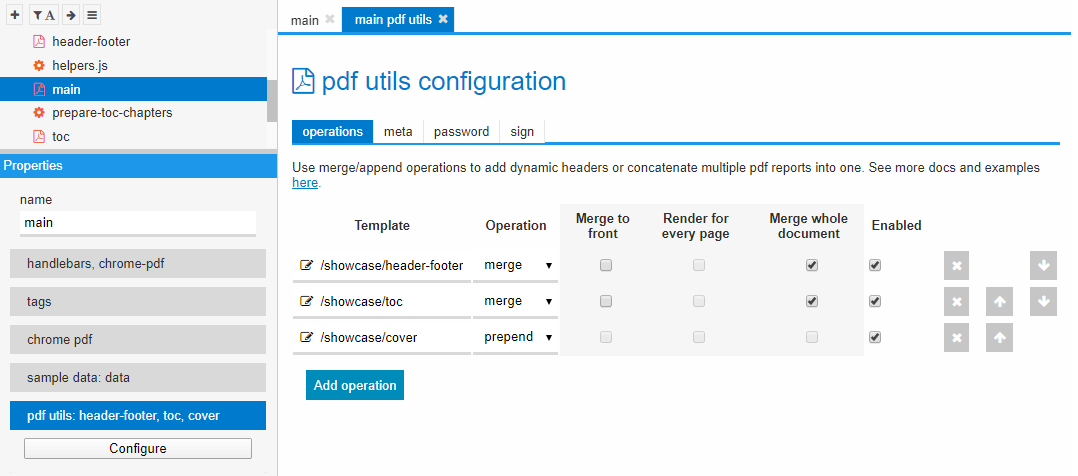
Operations
Each template can contain an ordered list of pdf operations which will be invoked after the main template rendering is finished. The operation required attributes are template and type. The template specifies what to render and the type what to do with the result. There are three operation types:
- prepend: render another template and put all the output pdf pages to the beginning
- append: the same as prepend, but just put the output pdf to the end
- merge: render another pdf template and merge the output single pdf page or whole document into the current pdf
Operations order
The operations are executed sequentially in the specified order. This is an important attribute because the input of every operation is the output of the previous one. This behavior can be explained on the following example.
Example It is required that the output pdf has at the beginning a single cover page and every other page includes a dynamic header. This can be solved with one prepend and one merge operation. However, if you move the merge operation after the prepend, it results in the undesired output with the header also merged into the first cover page. This is because the prepend operation in such an order runs the first and expands the final output with another page. This expanded pdf is then used as input of the second operation which invokes merge into every page which means also to the cover. The correct order, in this case, should be the merge operation the first and the prepend as the second.
Input data
The input data from the original template are forwarded to the rendering of the pdf operation. The operation input includes additional information about the current pdf.
{
   ...user data
   $pdf: {
    // array representing pdf before the current operation started
    pages: [{
       // explained bellow
       items: [{}],
       group: {}
    }]
   }
}
Note the $pdf is just another prop on the templating engine data context. When you are inside a loop, the context is different and you need to reach it in the templating engine specific way.
handlebars
{{@root.$pdf}}
jsrender
{{:~root.$pdf}}
Append and prepend
These two operations are straight forward. It is typically used to concatenate multiple heterogeneous reports into one. This fills the limitation of the pdf recipes which typically doesn't allow to have for example one page in portrait orientation and the second in the landscape. The solution is to create one append operation producing portrait pdf and one producing landscape.
Merge
The merge operation can be expressed as putting two transparent documents/papers on each other. This opens various use cases and possibilities. The merge can be used for example to add a watermark to every page. This requires an extra template with a positioned and transparent image in the middle. The merge operation with such a template puts the image on every page of the parent pdf.
The header scenario works the similar way. It is only required the header has already enough space in the parent template. This is typically done using margin settings provided by the recipe. This way the header can be positioned to the top, bottom, or even rotated to the side.
The merge operation includes three additional parameters.
- merge whole documents: if true, the operation will invoke rendering of the specified template and merge the whole pdf output into the current pdf, otherwise it also renders specified template but it takes just the first pdf page and merge it to every page of the current pdf
- render for every page: if true, the operation invokes rendering of the specified template for every pdf page (slow), otherwise it is invoked just once and the single output is merged
- merge to front: if true, the pdf produced by the operation is merged to the front layer, otherwise it is merged to the background
With merge whole documents enabled, the header template development requires more code but the resulting template has better performance. Such a header template typically needs to iterate over all pages and add a header with a page break. The output pdf then includes just headers which can be in one chunk merged into the current pdf. See this demonstrated on the following example.
Input data
In case the merge operation includes render for every page attribute the input data includes additionally $pdf.pageNumber and $pdf.pageIndex.
{
   ...user data
   $pdf: {
    pages: [...],
    pageNumber: 5,
    pageIndex: 4
  }
Adding items to the page
It is possible to add hidden information to a page of the main content which can be used in the pdf operations afterward. The page content can for example include a list of numbers that are summarized in the page header.
The extension provides templating engine helper pdfAddPageItem which adds value or hash to the page.
{{#each prices}}
  <span>{{value}}</span>
  {{{pdfAddPageItem value}}}
{{/each}}
The value can be then reached inside the pdf operation on $pdf.pages[x].items[y]. See the example of merge with items.
The passed item can be also an object with properties.
handlebars:
{{{pdfAddPageItem name="Jan" age=33}}}
jsrender:
{{pdfAddPageItem name="Jan" age=33 /}}
Note passing objects like this works only for handlebars and jsrender.
Grouping pages
Another use case is when the report is represented by multiple groups of pages and it is required to make the header dynamic based on the particular group. This can be reached using helper pdfCreatePagesGroup.
The main pdf report producing the list of students can look like this
{{#each students}}
    <h1 style='page-break-before: always'>{{name}}</h1>
    {{{pdfCreatePagesGroup name}}}
    <div>lots of other content expanding to multiple pages</div>
    ....
{{/each}}
The difference to page items is that the group doesn't need to be specific to a single page. It should be created just once at the top of the group and all pages share it until there isn't another the one created.
The group information can be then retrieved from $pdf.pages[x].group property. See the example of merge with groups.
The passed group can also be an object with properties
handlebars:
{{{pdfCreatePagesGroup name="Jan" age=33}}}
jsrender:
{{pdfAddPageItem name="Jan" age=33 /}}
ToC - table of contents
The pdf utils can be used also to dynamically create pdf table of contents including the outlines. The main fundamental problem here is that we don't know the page numbers of headings at the time we render the template. There are two approaches how to solve this. However, some concepts are common.
The clickable links are implemented using standard html anchors.
<a href='#hello-world'>Hello world</a>
<h1 id='hello-world'>Hello world</h1>
The pdfAddPageItem is used to add hidden marks next to headings so we can later calculate the page number based on the heading id.
The data-pdf-outline pdf utils attributes are used to create pdf bookmarks for easier navigation.
Render twice
The easiest approach is to render the template twice using script. The pdf from the first time render is parsed using afterRender script and with the knowledge of page numbers marked using pdfAddPageItem rendered again.
Rendering main template twice may cost significant time. If this is your case, check the next approach.
Merge extra ToC template
The main idea is to create an extra template for the ToC and merge it into the main one using the pdf utils operation.
Only the Toc template will be rendered twice. As an html child template inside the main one, this time we don't know the page numbers so the values will be just skipped. The second time ToC will be rendered as pdf utils merge operation. At this time the page numbers will be known and properly merged.
This approach is more complicated, because you may need to position the ToC in the middle of the document or even add multiple ToC. The stock showcase may serve as a good example for complex cases.
Usage in script
For more advanced scenarios which require dynamic manipulation of the operations to be done on the PDF, there are methods (pdfUtils.parse, pdfUtils.prepend, pdfUtils.append, pdfUtils.merge, pdfUtils.outlines) exposed in the special module jsreport-proxy, which is available in scripts.
const jsreport = require('jsreport-proxy')

async function afterRender(req, res) {
    // after rendering with some pdf recipe we can use .parse to read the text in the pdf
    const $pdf = await jsreport.pdfUtils.parse(res.content, true)

    // we can check some condition and apply some operation, in this case we append the result of
    // another render into the current PDF
    if ($pdf.pages[0] && $pdf.pages[0].text != null && $pdf.pages[0].text.includes('First')) {
        const appendRes = await jsreport.render({
            template: {
                content: 'Second page',
                engine: 'none',
                recipe: 'chrome-pdf'
            },
            data: {
                ...req.data,
                $pdf
            }
        })

        res.content = await jsreport.pdfUtils.append(res.content, appendRes.content)
    }
}
You can find a complete example using pdf-utils in script here
Methods available:
parse(sourcePdfBuf, includeText = false)
parameters:
sourcePdfBuf-> a buffer which contains the pdf to parseincludeText-> indicates if text should be parsed or not
returns:
- promise of an object with the same structure as the object passed as input data to the merge operations described previously
{
  pages: [{
     items: 'in case there are items described previously ',
     group: 'in case there is group mark described previously',
     text: 'in case includeText=true'
  }]
}
prepend(sourcePdfBuf, prependedPdfBuf, options)
parameters:
sourcePdfBuf-> pdf buffer to which to prepend the second paramprependedPdfBuf-> pdf buffer prepended before sourceoptions-> (optional)pdfAccessibility.enabled-> if the accessibility tags should be copied during the operation
returns:
- promise of the buffer with concatenated pdfs
append(sourcePdfBuf, appendedPdfBuf, options)
parameters:
sourcePdfBuf-> pdf buffer to which to append the second paramappendedPdfBuf-> pdf buffer appended after sourceoptions-> (optional)appendAfterPageNumber-> the number of page fromsourcePdfBufwhich the pages fromappendedPdfBufshould be inserted afterpdfAccessibility.enabled-> if the accessibility tags should be copied during the operation
returns:
- promise of the buffer with concatenated pdfs
merge(sourcePdfBuf, extraPdfBuf, options)
parameters:
sourcePdfBuf-> pdf buffer to which to mergeextraPdfBuf-> it can be one buffer representing pdf document, which gets merged into the source or an array of pdf buffers representing individual pages which gets merged into source page by pageoptions-> (optional)mergeToFront-> boolean that indicates if the pages should be merged in front of the current pagespdfAccessibility.enabled-> if the accessibility tags should be copied during the operation
returns:
- promise of final pdf buffer with merged content
addAttachment(sourcePdfBuf, attachmentBuf, options)
parameters:
sourcePdfBuf-> source pdf bufferattachmentBuf-> buffer with attachment contentoptions->{ name, description, creationDate, modificationDate }only thenameis required
returns:
- promise with pdf buffer with attachment
outlines(sourcePdfBuf, outlines)
parameters:
sourcePdfBuf-> source pdf bufferoutlines-> Array of objects ({ id: <string>, title: <string>, parent: <string> }) which are used to define outlines in the PDF
returns:
- promise with pdf buffer extended with outlines
removePages(sourcePdfBuf, pageNumbers)
parameters:
sourcePdfBuf-> source pdf bufferpageNumbers-> Array of numbers or one number, the page numbers starts from 1
returns:
- promise with pdf buffer without removed pages
postprocess(sourcePdfBuf, { pdfMeta, pdfPassword, pdfSign, outlines } = {})
parameters:
sourcePdfBuf-> source pdf bufferoptions-> optioaly set password, meta, sign or outlines
returns:
- promise with pdf buffer with cleaned hidden marks and optionally added meta,password,sign or outlines
Pdf meta
The pdf utils extension can fill the basic pdf document metadata Title, Author, Subject, Keywords, Creator, and Producer. These can be filled using the pdf utils extension studio UI. Or you can do it also through the API call.
{
  "template": {
    "content": "Main Template",
    "recipe": "chrome-pdf",
    "engine": "handlebars",
    "pdfMeta":  {
        "title": "title",
        "author": "author",
        "subject": "subject",
        "keywords": "keywords",
        "creator": "creator",
        "producer": "producer",
        "custom": "{\"aKey\": \"a val\"}"
    }
  }
}
Password protection
The pdf utils extension supports encrypting output pdf and protecting it with a password. Note this is always disabled when you run from the studio. Use the download button from the run context menu to see the protected output.
The two passwords can be specified user password and owner password. One or both of them. Behavior differs according to passwords you provide:
- When only the user password is provided, users with user password can decrypt the file and have full access to the document.
- When only the owner password is provided, users can decrypt and open the document without providing any password, but the access is limited to those operations explicitly permitted. Users with the owner password have full access to the document.
- When both passwords are provided, users with user password can decrypt the file but only have limited access to the file according to permission settings. Users with owner password have full access to the document.
Additionally, you can select specific permissions:
printing - notAllowed | lowResolution | highResolution
modifying - true | false
copying - true | false
annotating - true | false
fillingForms - true | false
contentAccessibility - true | false
documentAssembly - true | false
The complete details can be found in the pdf specification here.
The pdf encryption can be set through jsreport studio and also through API call.
{
  "template": {
    "content": "Main Template",
    "recipe": "chrome-pdf",
    "engine": "handlebars",
    "pdfPassword": {
       "password": "password",
       "ownerPassword": "password",
       "printing": "highResolution",
       "modifying": true,
       "copying": true,
       "annotating" true,
       "fillingForms": true
       "contentAccessibility": true
       "documentAssembly": true
    }
  }
}
Pdf sign
You can use the extension to sign the output pdf with the p12 certificates. Note this is always disabled when you run from the studio. Use the download button from the run context menu to see the signed output.
Sign using studio
Open studio and upload p12 certificate as a new asset. For the testing purposes, you can create your p12 certificate using openssl.
openssl genrsa -out myKey.pem
openssl req -new -key myKey.pem -out cert.csr
openssl x509 -req -in cert.csr -signkey myKey.pem -out cert.crt
openssl pkcs12 -export -in cert.crt -inkey myKey.pem -out cert.p12
If your certificate has a password, fill it in through asset pdf sign settings properties inside the studio.
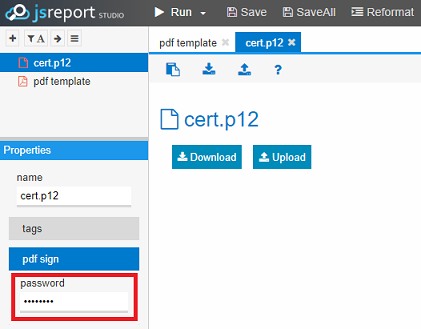
In this case, you need to configure or disable also jsreport encryption because this extension uses the encryption API to protect password before storing.
The next step is to select the certificate in the pdf utils template menu.
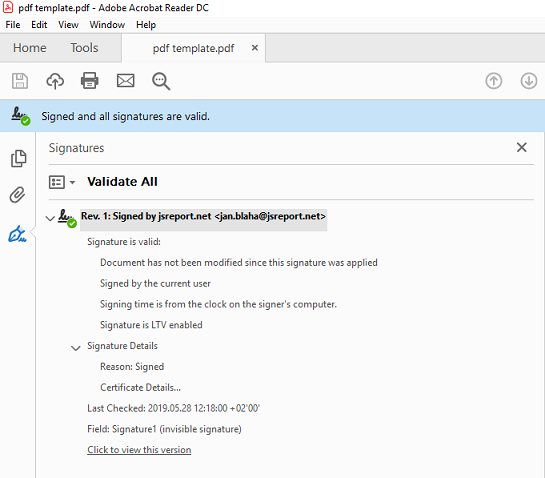
The last step is to verify the pdf is properly signed. Install the certificate on your client machine and make sure it is trusted. Then open the Adobe Acrobat and you should see the message "Signed and all signatures are valid".
Sign using API
You may want to avoid storing your certificates inside jsreport store. In this case, you can send the encoded certificate inline in your rendering request.
POST http://jsreportserver:5488/api/report

{
  "template": {
    "name": "my template",
    "pdfSign": {
      "certificateAsset": {
        "content": "base64 encoded certificate"
        "encoding": "base64",
        "password":  "certificate password"
      },
      "reason": "I am signing this pdf"
    }
  }
}
pdf/A
The pdf-utils can try to convert the pdf output into pdf/A-1B compatible format. This can be enabled in the pdf utils UI or through API. Please note this feature is currently in beta.
 "template": {
     ...
     "pdfA": {
        "enabled": true
     }
  }
}
pdf accessibility
The chrome-pdf recipe by default produce pdf with accessibility tags. However, these tags aren't preserved when joining multiple documents together with pdf-utils. The accessibility tags propagation can be preserved through pdf-utils UI or through API. Please note this feature is currently in beta.
The initial limited PDF/UA support was added in jsreport 4.2.0. The current implementation requires the template developer to additionally add alt attributes or adapt styles for the pdf output to match the PDF/UA spec.
{
    "template": {
        ...
        "pdfAccessibility": {
              "enabled": true,
              "pdfUA": true
         }
     }
 }
pdf compression
The pdf utils may compress the final pdf and reduce its size. This can be enabled in the studio pdf utils properties or through API. This is currently in beta, please don't hesitate to report issues.
{
    "template":  {
        ...
        "pdfCompression":  {
             "enabled":  true
        }
    }
}
pdfDest
This helper can be used to create cross template links in the pdf.
In one template you can create anchor as usual, the only trick is to put it the same id attribute as it is targeting.
<!-- one template-->
<a href='#1' id='1'>
  link to another template
</a>
The second template then uses pdfDest helper to mark the place, where the link is targeted.
<!-- second template (appended)-->
{{{pdfDest "1"}}}
<h1>hello</h1>
Forms
The pdf forms are an experimental jsreport feature and the API may change in the future versions. Please help us and report problems or submit feature requests.
The extension adds also helper pdfFormField which can be used to create pdf forms. You can place the helper call anywhere in your html/css and it gets properly positioned.
Example:
<div>
    <span>Name:</span>
    <span>
    {{{pdfFormField name='firstName' type='text' width='200px' height='20px'}}}
    </span>
</div>
<div>
    {{{pdfFormField
        name='btnSubmit'
        type='button'
        action='submit'
        label='submit'
        exportFormat=true
        url='http://mydomain.com'
        backgroundColor='#AAAA00'
        width='245px'
        height='20px'
        }}}
</div>
The helper call common arguments are the following:
name (required) - the field identification
type (required) - currently supported text, button, combo
width (required) - the field width, needs to be in px
height (required) - the field height, needs to be in px
color - the color string css style for text color
backgroundColor - the color string css style for background color
border - the pdf like border definition, defaults to "0,0,0". Please refer to the pdf spec
fontFamily - the font isn't inherited from the outer text at this moment and if you want to use a specific font, you need to set here one of the [pdf standard fonts] (https://kbpdfstudio.qoppa.com/standard-14-pdf-fonts/). The custom embedded fonts aren't supported in fields at this moment
fontSize - the text size, needs to be in px. The default size is computed to fit the field height and width
textAlign - one of the left, center, right
Text field
{{{pdfFormField name='firstName' color='#FF0000' required=true type='text' width='200px' height='20px'}}}
value - the visible value
defaultValue - value stored in form, when nothing is filled, this value isn't visible
readOnly - bool if the field is read only
required - bool if the field is required
multiline - bool for multiline text fields
password - bool for password like text fields
Formatting
The text fields can be quickly formatted using the following pdfFormField arguments.
formatType - one of the date, time, percent, number, zip, zipPlus4, phone or ssn
Date format
formatMask - specifies the value and display format and can include:
d- single digit day of monthdd- double digit day of monthm- month digitmm- month double digitmmm- abbreviated month namemmmm- full month nameyy- two digit yearyyyy- four digit yearhh- hour for 12 hour clockHH- hour for 24 hour clockMM- two digit minutett- am or pm
Time format
formatMask - value is one of the following HH:mm, hh:mm, HH:mm:ss, hh:mm:ss
Number and percent
formatFractionalDigits - the number of places after the decimal point
formatSepComma - bool if pdf should display a comma separator, otherwise do not display a separator.
formatNegStyle the value must be one of MinusBlack , Red, ParensBlack, ParensRed
formatCurrency a currency symbol to display
formatCurrencyPrepend set to true to prepend the currency symbol
Combo field
{{{pdfFormField name='gender' type='combo' value='b' items='man,woman' width='100px' height='20px'}}}
The combo field additionally requires the items attribute. That can be a string where items are separated using comma , or an actual array. The value, defaultValue, required, readOnly attributes are the same as for the text fields.
Button field
{{{pdfFormField name='btn1' type='button' exportFormat=true url='http://myendpoint.com' action='submit' label='submit' width='200px' height='50px'}}}

{{{pdfFormField name='btn2' type='button' action='reset' label='reset' width='200px' height='50px'}}}
action - submit/reset
label - text on the button
url - url where to send the form after submit
The submit button can additionally include one or more submit flags. Please see the description in the pdf specification here.
Signature field
{{{pdfFormField name='test' type='signature' width='100px' height='50px'}}}
Checkbox field
{{{pdfFormField name='isOnSale' type='checkbox' visualType='square' width='150px' defaultValue=true height='20px'}}}
Two visualType are supported: check and square. The defaultValue and value accepts true|false.
API
The extension features can be used also directly through API without a need to use the studio or persist templates.
{
  "template": {
    "content": "Main Template",
    "recipe": "chrome-pdf",
    "engine": "handlebars",
    "chrome": {
      "marginTop": "50px"
    },
    "pdfOperations": [{
      "template": {
        "content": "Header",
        "recipe": "chrome-pdf",
        "engine": "handlebars"
      },
      "type": "merge"
    }],
    "pdfMeta":  {
        "title": "title",
        "author": "author",
        "subject": "subject",
        "keywords": "keywords",
        "creator": "creator",
        "producer": "producer",
        "custom": "{\"aKey\": \"a val\"}"
    },
    "pdfSign": {
      "certificateAsset": {
        "content": "base64 encoded certificate"
        "encoding": "base64",
        "password":  "certificate password"
      },
      "reason": "I am signing this pdf"
    },
    "pdfPassword": {
       "password": "password",
       "ownerPassword": "password",
       "printing": "HighResolution",
       "modifying": true,
       "copying": true,
       "annotating" true,
       "fillingForms": true
       "contentAccessibility": true
       "documentAssembly": true
    },
    "pdfAccessibility": {
      "enabled": true
    },
    "pdfA": {
      "enabled": true
    },
    "pdfAccessibility": {
      "enabled": true,
      "pdfUA": true
    },
    "pdfCompression": {
    "enabled": true,
    "jpegQuality": 60,
    "removeAccessibility": true,
    "useObjectStreams": true,
    "recompressStreams": true,
    "convertImagesToJpeg": true,
    "removeEffects": true
    }
  },
  "options": {
    "pdfUtils": {
      "removeHiddenMarks": true
    }
  }
}
The operation specification looks like this:
{
   "type": "merge" | "append" | "prepend",
   "mergeWholeDocument": true | false,
   "renderForEveryPage": true | false,
   "template": { "content": "Hello"... },
   "templateShortid": "xxx"
}