Single Sign On With Keycloak
08-01-2022 20:00This post is intended to describe the single sign on capabilities of jsreport with the Keycloak authorization server, we will focus on the two ways you can use this feature to integrate the jsreport studio with Keycloak and delegate the user authentication to it.
Installing jsreport
Let's start by installing jsreport, create a new directory on your preferred location and run jsreport init.
when it is done you should see something like this on your terminal
➜ jsreport init
jsreport installation not found, installing jsreport the latest version now, wait a moment...
jsreport installation finished..
Creating server.js
Creating package.json
Creating default config jsreport.config.json
Initialized
Run Keycloak
The easiest way to install and run Keycloak is by using Docker, so let's go that route.
run the following docker run -p 8080:8080 -e KEYCLOAK_ADMIN=admin -e KEYCLOAK_ADMIN_PASSWORD=admin quay.io/keycloak/keycloak:19.0.1 start-dev, which will start Keycloak on port 8080 with an initial admin user
username: admin
password: admin
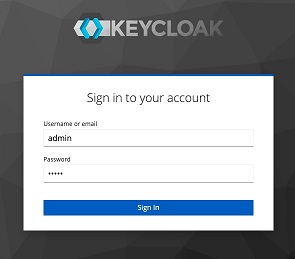
Now we need to configure the Keycloak, to do this we go to the Keycloak Admin Console and login there with the admin username and password we specified in the docker run ....
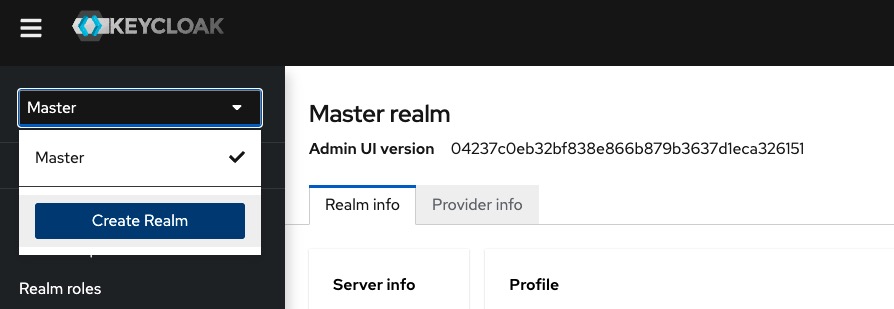
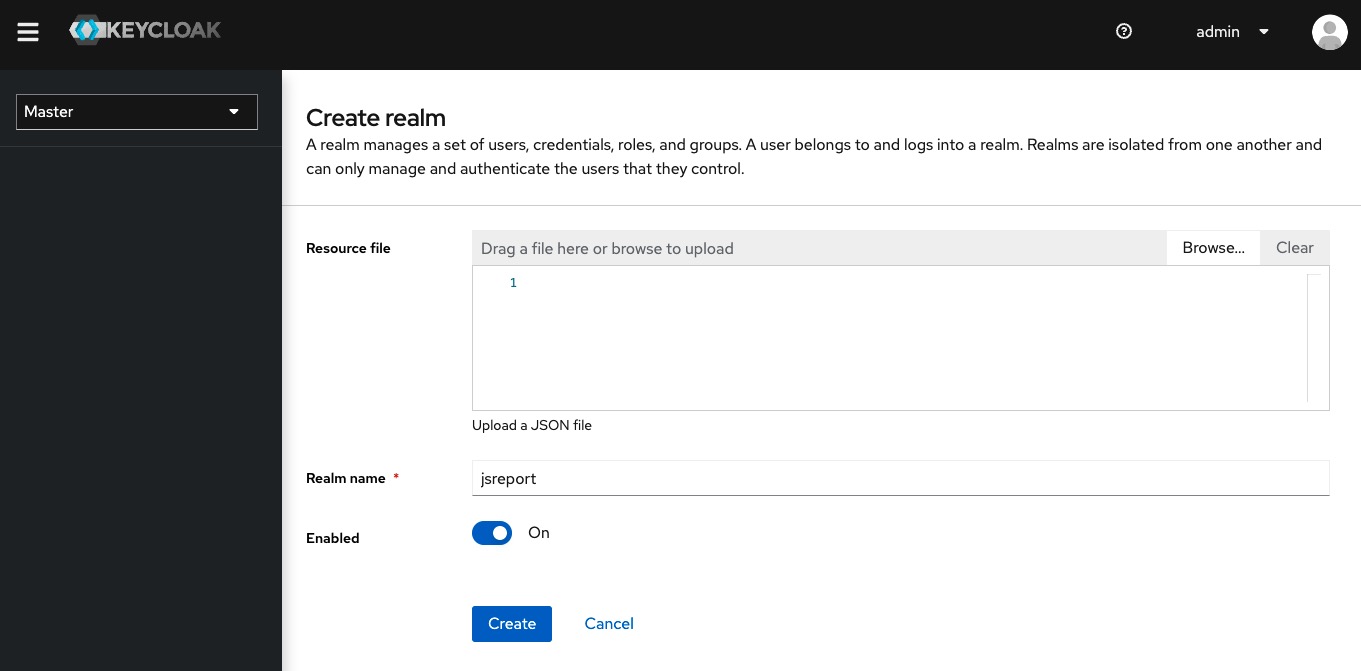
We start by creating a new realm. We open the select on the left side bar and click Create Realm and use the name jsreport.
With the jsreport realm created we can now access the OpenID endpoints exposed by Keycloak by opening page http://localhost:8080/realms/jsreport/.well-known/openid-configuration. We need to copy some of these endpoints in the jsreport configuration in order to configure the integration appropriately.
Configuring authorization server in jsreport
Open the jsreport.config.json file and add the following changes:
- set
extensions.authentication.cookieSession.secretto a secret value - change the
extensions.authentication.enabledtotrue - add
extensions.authentication.authorizationServerconfiguration- set
extensions.authentication.authorizationServer.nametoKeycloakServer - set
extensions.authentication.authorizationServer.issuerto the value of theissuerkey listed in the Keycloak OpenID configuration - set
extensions.authentication.authorizationServer.usernameFieldtopreferred_username - set
extensions.authentication.authorizationServer.endpoints.jwksto the value of thejwks_urikey listed in the Keycloak OpenID configuration - set
extensions.authentication.authorizationServer.endpoints.authorizationto the value of theauthorization_endpointkey listed in the Keycloak OpenID configuration - set
extensions.authentication.authorizationServer.endpoints.tokento the value of thetoken_endpointkey listed in the Keycloak OpenID configuration - set
extensions.authentication.authorizationServer.endpoints.introspectionto the value of theintrospection_endpointkey listed in the Keycloak OpenID configuration - set
extensions.authentication.authorizationServer.endpoints.userinfoto the value of theuserinfo_endpointkey listed in the Keycloak OpenID configuration
- set
Your jsreport.config.json after these changes should look like this:
{
  "httpPort": 5488,
  "store": {
    "provider": "fs"
  },
  "blobStorage": {
    "provider": "fs"
  },
  "logger": {
    "console": {
      "transport": "console",
      "level": "debug"
    },
    "file": {
      "transport": "file",
      "level": "info",
      "filename": "logs/reporter.log"
    },
    "error": {
      "transport": "file",
      "level": "error",
      "filename": "logs/error.log"
    }
  },
  "trustUserCode": false,
  "reportTimeout": 60000,
  "workers": {
    "numberOfWorkers": 2
  },
  "extensions": {
    "authentication": {
      "cookieSession": {
        "secret": "secret"
      },
      "admin": {
        "username": "admin",
        "password": "password"
      },
      "authorizationServer": {
        "name": "KeycloakServer",
        "issuer": "http://localhost:8080/realms/jsreport",
        "usernameField": "preferred_username",
        "endpoints": {
          "jwks": "http://localhost:8080/realms/jsreport/protocol/openid-connect/certs",
          "authorization": "http://localhost:8080/realms/jsreport/protocol/openid-connect/auth",
          "token": "http://localhost:8080/realms/jsreport/protocol/openid-connect/token",
          "introspection": "http://localhost:8080/realms/jsreport/protocol/openid-connect/token/introspect",
          "userinfo": "http://localhost:8080/realms/jsreport/protocol/openid-connect/userinfo"
        }
      },
      "enabled": true
    },
    "sample-template": {
      "createSamples": true
    }
  }
}
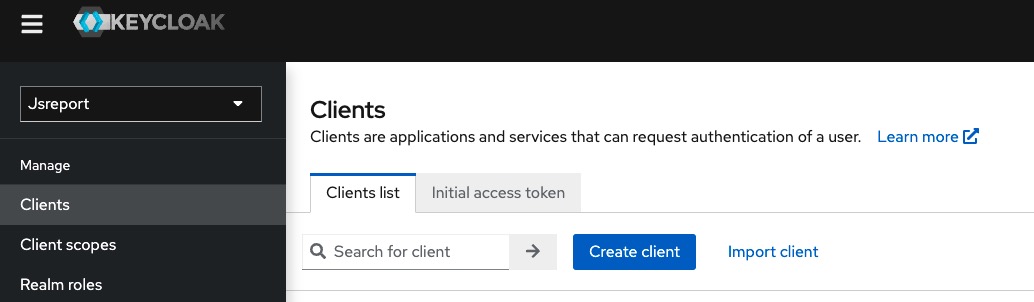
Creating client applications for jsreport in Keycloak
Now we need to register the jsreport studio and jsreport http api applications in keycloak so that they can request authentication of a user against keycloak.
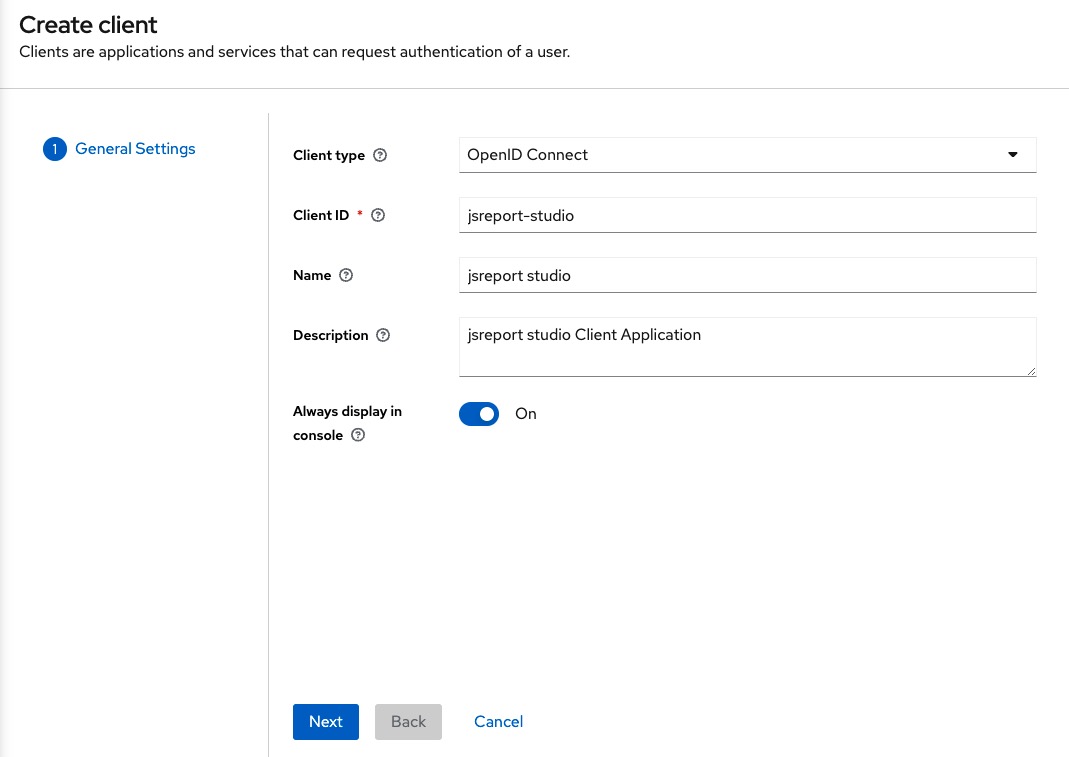
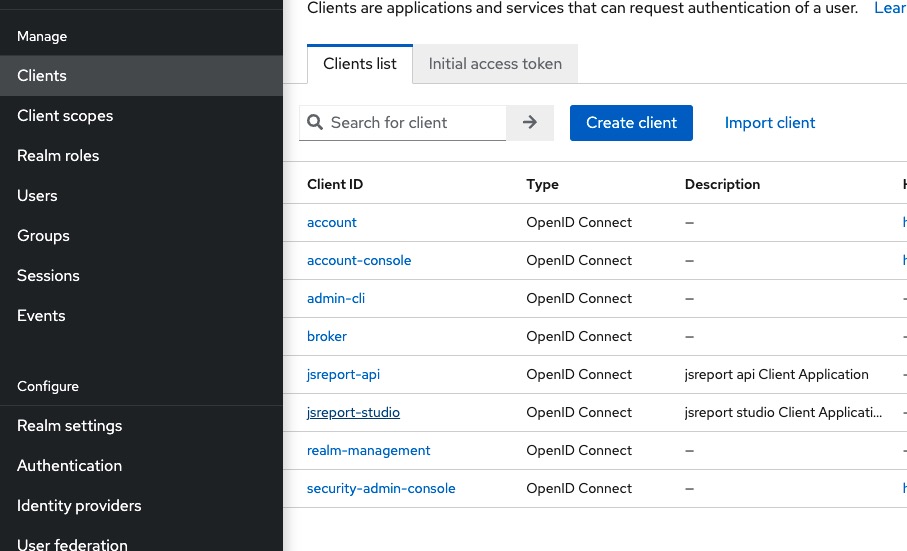
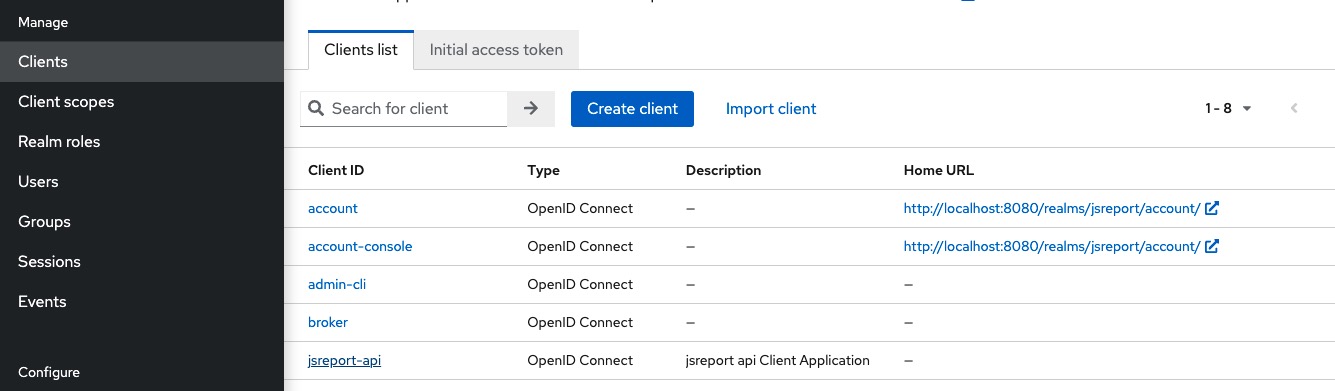
To do this, we click to the Clients on the left side bar and then click Create client.
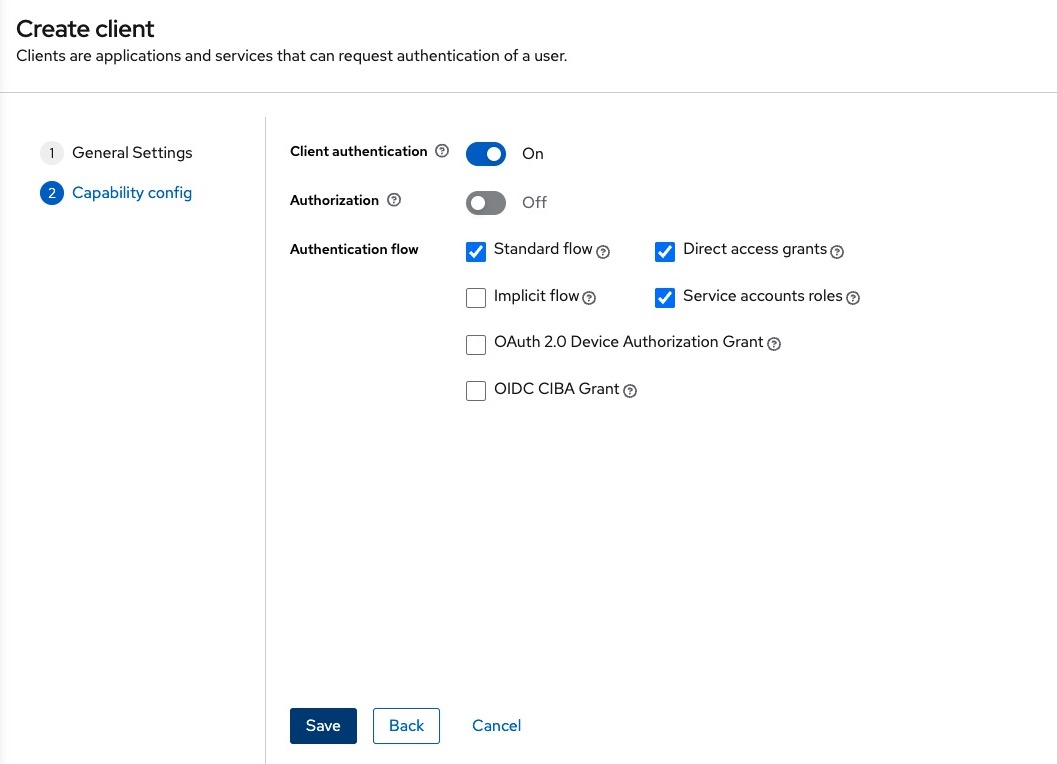
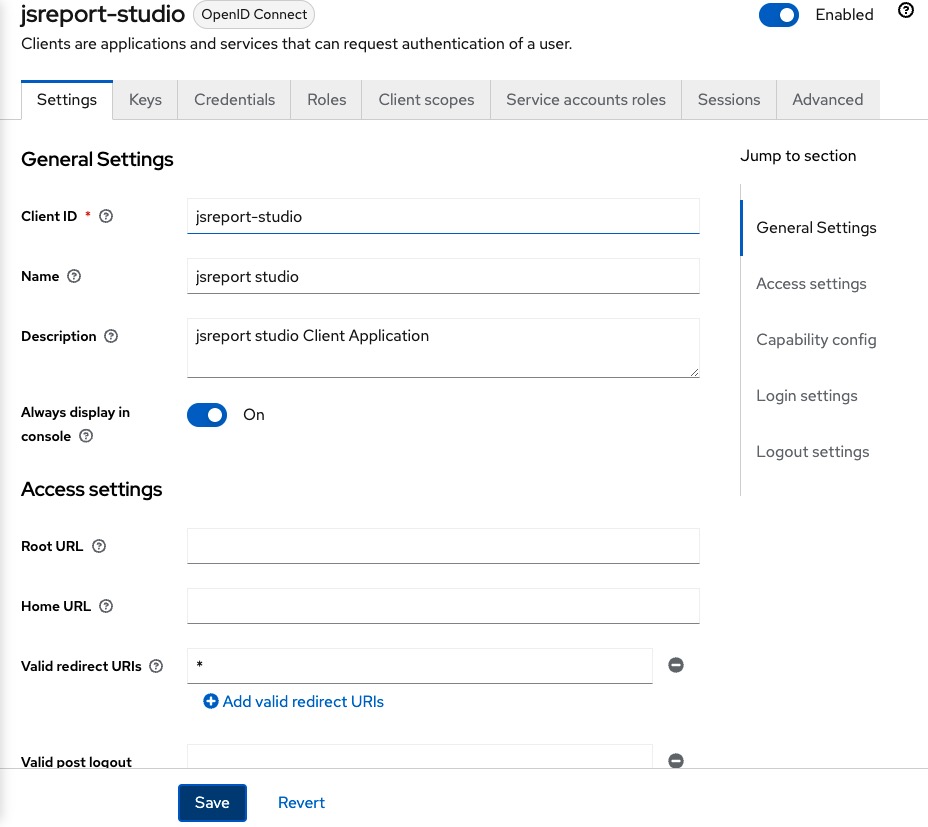
Register the following information and click Save for the jsreport-studio.
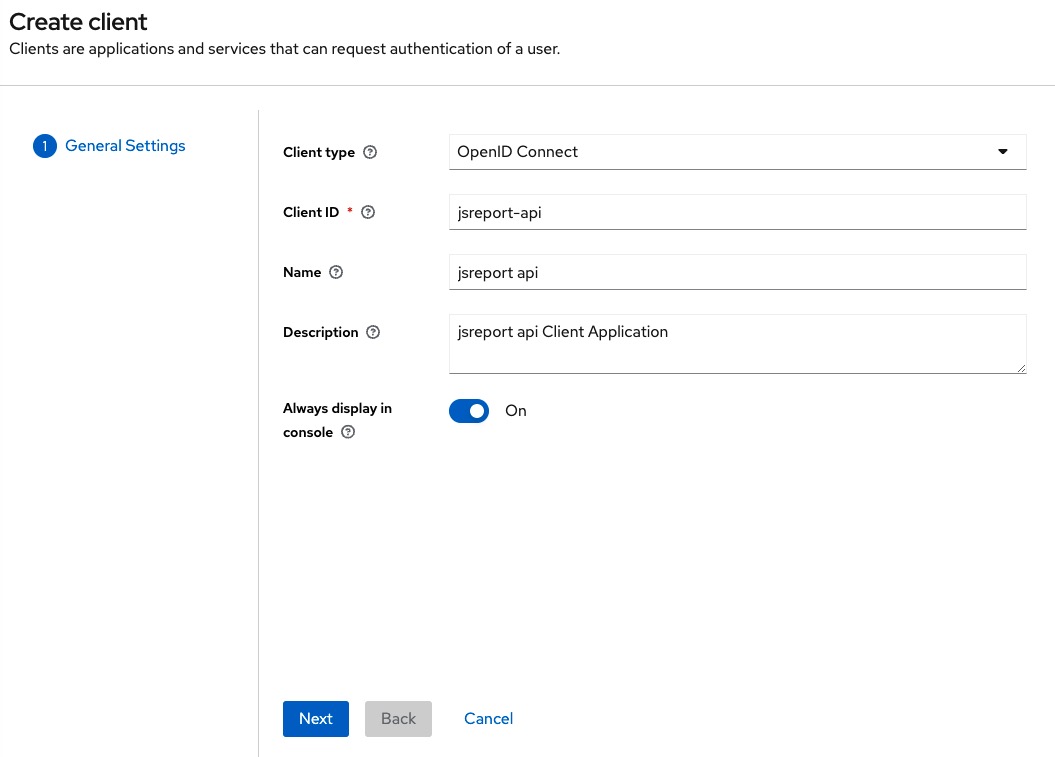
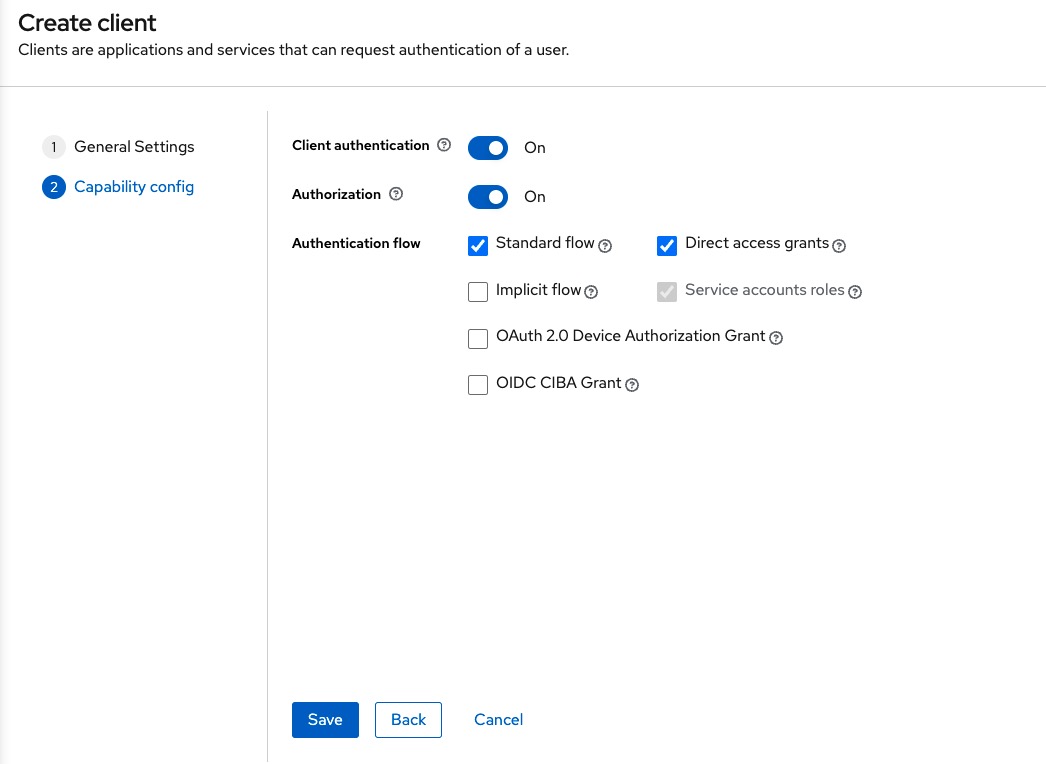
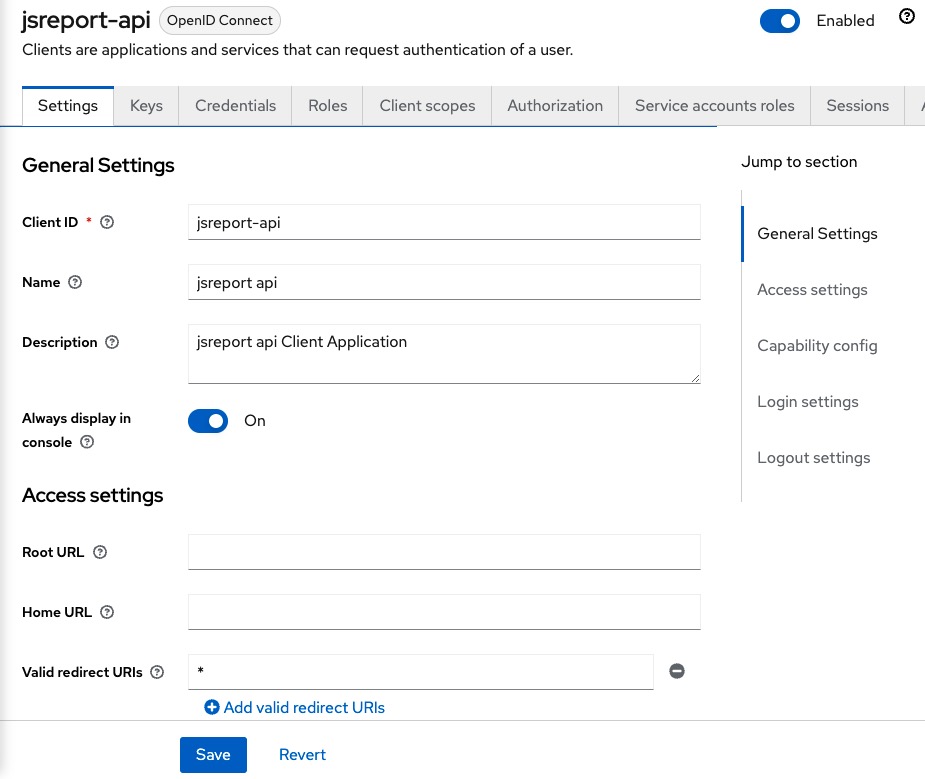
And the following information for the jsreport-api
Back in the Clients list page we click on the jsreport-studio, add * to the Valid redirect URIs field and click Save.
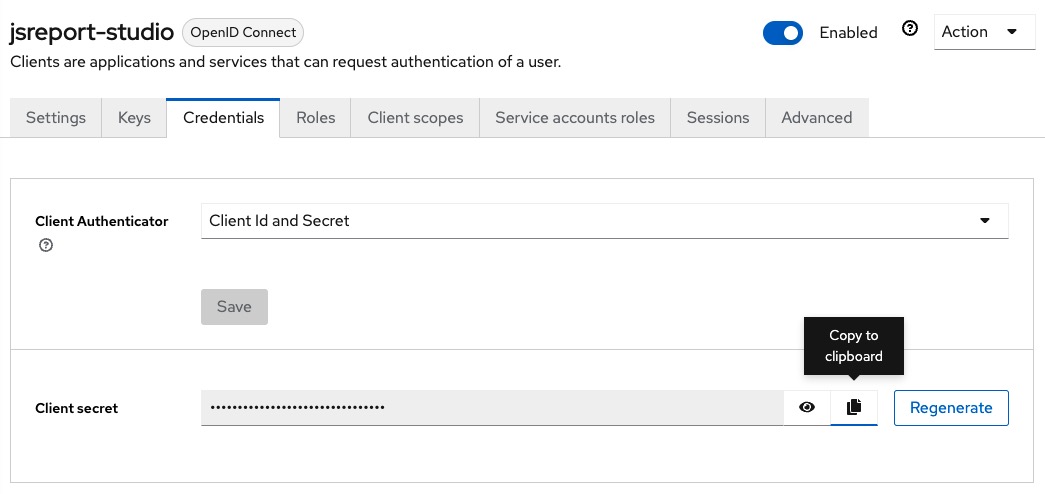
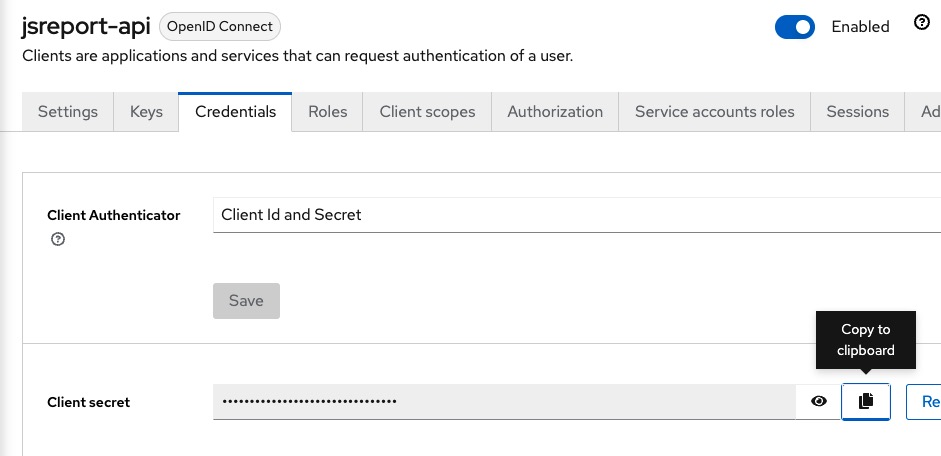
Now we need to copy the credentials generated for this client application and add them to the jsreport.config.json, we click the Credentials tab and click on the Copy to clipboard for the Client secret.
With the secret copied, we open the jsreport.config.json and add the following at extensions.authentication.authorizationServer.studioClient
"authorizationServer": {
  ...
  "studioClient": {
    "clientId": "jsreport-studio",
    "clientSecret": "<the secret your copied from keycloak>"
  }
  ...
}
We repeat the same steps for the jsreport-api client, we add * to the Valid redirect URIs field, copy the secret and add it to the extensions.authentication.authorizationServer.apiResource.
"authorizationServer": {
  ...
  "apiResource": {
    "clientId": "jsreport-api",
    "clientSecret": "<the secret your copied from keycloak>"
  }
  ...
}
The final jsreport.config.json should look something like this (remember that you should replace the parts <the secret your copied from keycloak> with the values you copy from Keycloak).
{
  "httpPort": 5488,
  "store": {
    "provider": "fs"
  },
  "blobStorage": {
    "provider": "fs"
  },
  "logger": {
    "console": {
      "transport": "console",
      "level": "debug"
    },
    "file": {
      "transport": "file",
      "level": "info",
      "filename": "logs/reporter.log"
    },
    "error": {
      "transport": "file",
      "level": "error",
      "filename": "logs/error.log"
    }
  },
  "trustUserCode": false,
  "reportTimeout": 60000,
  "workers": {
    "numberOfWorkers": 2
  },
  "extensions": {
    "authentication": {
      "cookieSession": {
        "secret": "secret"
      },
      "admin": {
        "username": "admin",
        "password": "password"
      },
      "authorizationServer": {
        "name": "KeycloakServer",
        "issuer": "http://localhost:8080/realms/jsreport",
        "usernameField": "preferred_username",
        "endpoints": {
          "jwks": "http://localhost:8080/realms/jsreport/protocol/openid-connect/certs",
          "authorization": "http://localhost:8080/realms/jsreport/protocol/openid-connect/auth",
          "token": "http://localhost:8080/realms/jsreport/protocol/openid-connect/token",
          "introspection": "http://localhost:8080/realms/jsreport/protocol/openid-connect/token/introspect",
          "userinfo": "http://localhost:8080/realms/jsreport/protocol/openid-connect/userinfo"
        },
        "studioClient": {
          "clientId": "jsreport-studio",
          "clientSecret": "<the secret your copied from keycloak>"
        },
        "apiResource": {
          "clientId": "jsreport-api",
          "clientSecret": "<the secret your copied from keycloak>"
        }
      },
      "enabled": true
    },
    "sample-template": {
      "createSamples": true
    }
  }
}
Configuring keycloak users for login to jsreport studio
jsreport needs to know how to associate the users from Keycloak to users/groups in jsreport. This association is needed to correctly identify which jsreport entities and permissions the user of Keycloak is able to work with in the context of jsreport.
There are two ways we can use the keycloak users for the login in jsreport studio.
- associate a keycloak user to an existing jsreport user. This method requires that you create jsreport user, keycloak user and match them, mostly by a claim that points to the username. With this method you need to duplicate your keycloack users in jsreport, to make both working together. This method only exists for legacy reasons because before the jsreport
3.2.0version the only way to attach permissions was to use jsreport users and it was needed an strict map. - associate a keycloak user to a jsreport group. This method allows you to avoid duplicating keycloak users in jsreport. On the jsreport side you will need to handle all the permissions in jsreport using
groups, by attaching permissions directly to theread permission group,edit permissions groupfields of entities, and on the Keycloak side you will need to set an extra attribute on each user in order to associate it to the jsreport group it belongs.
Option 1: Associate a keycloak user to an existing jsreport user
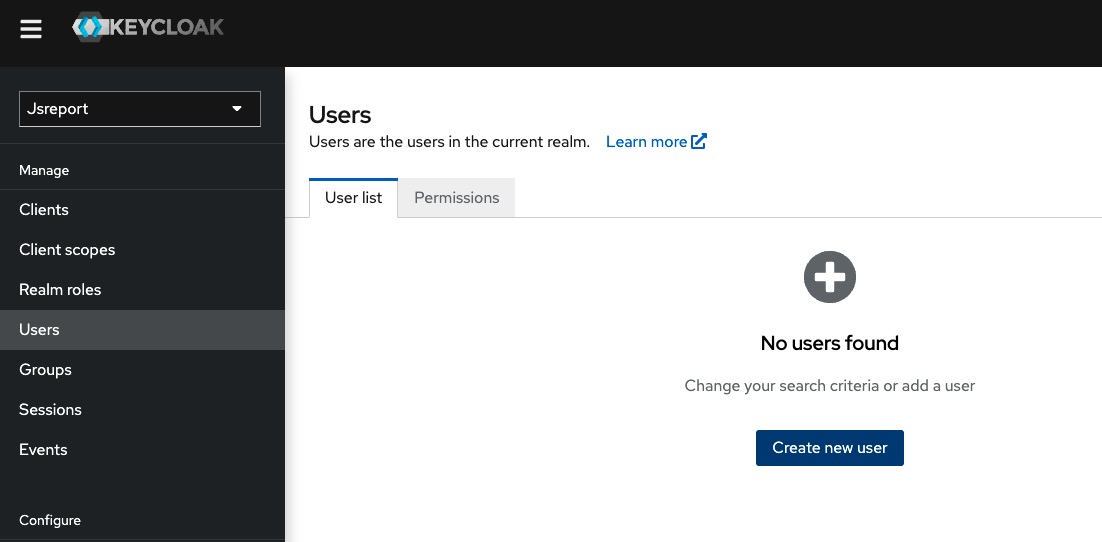
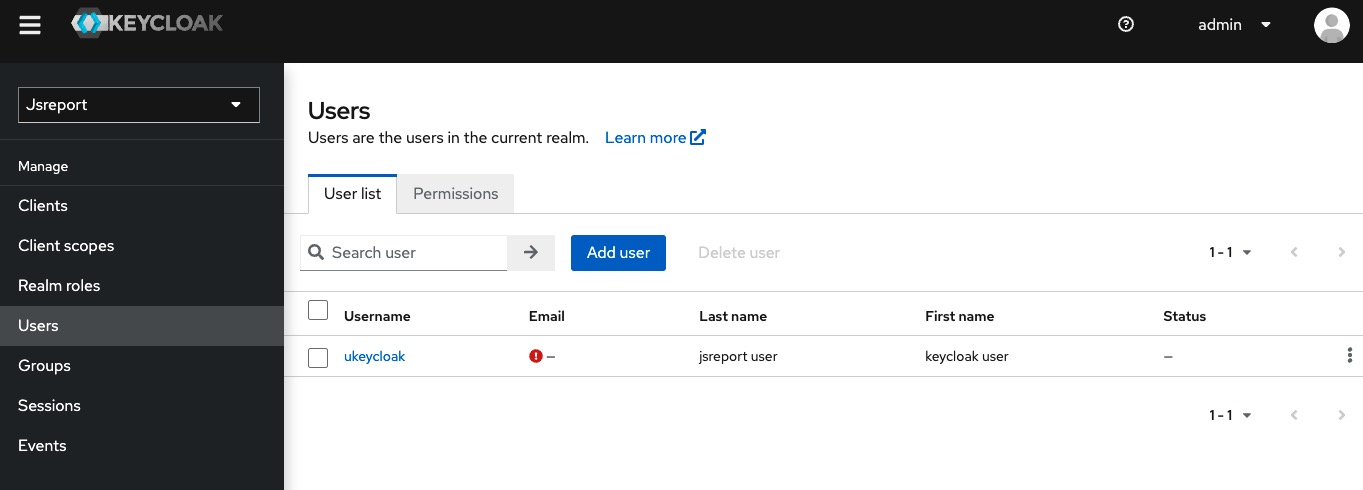
Open Keycloak Admin Console and navigate to the Users section at the left side bar and click Create new user.
There we fill the following information and click Create:
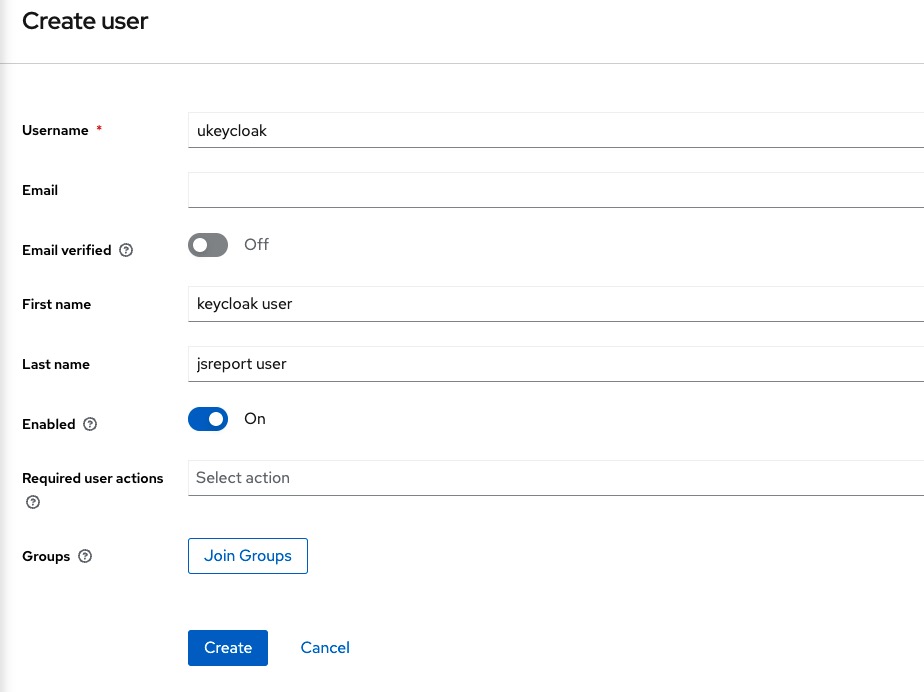
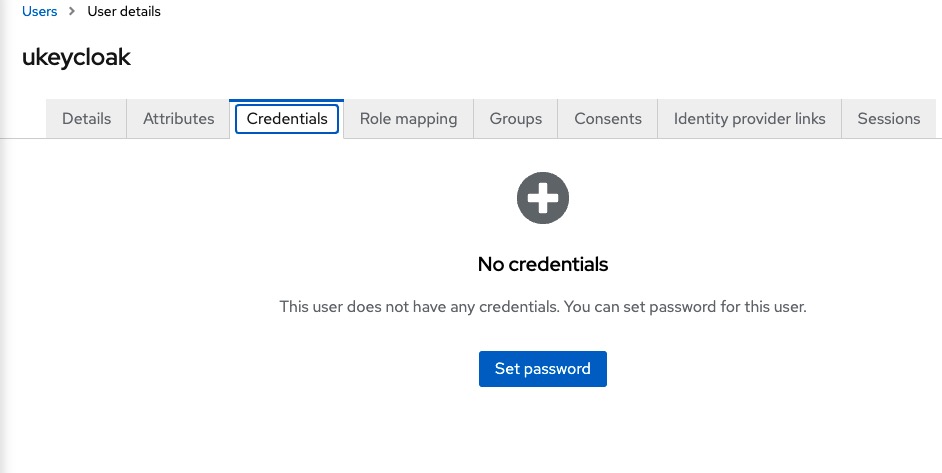
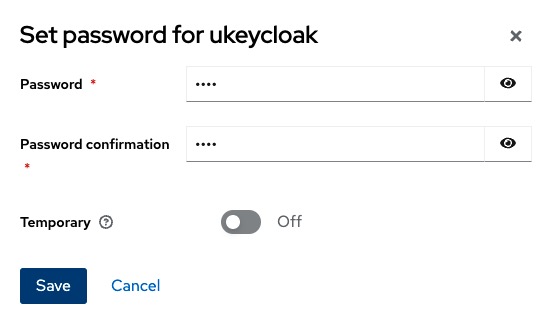
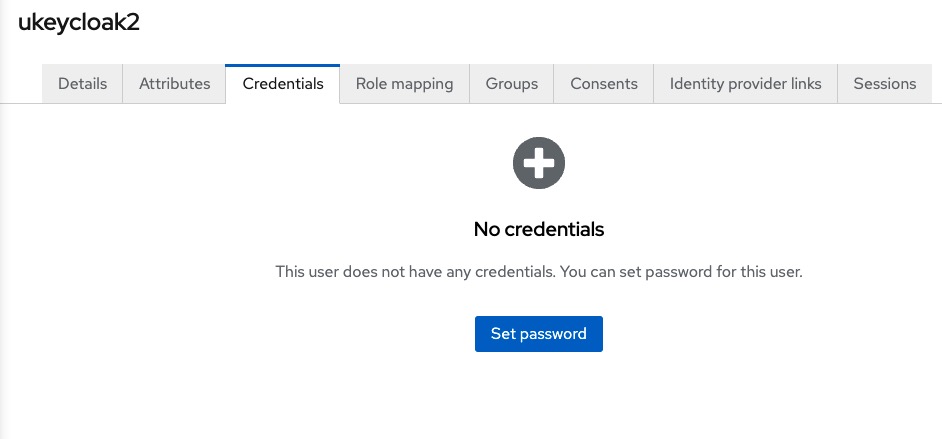
The we click on the Credentials tab, click Set password and create a password for this user and click Save.
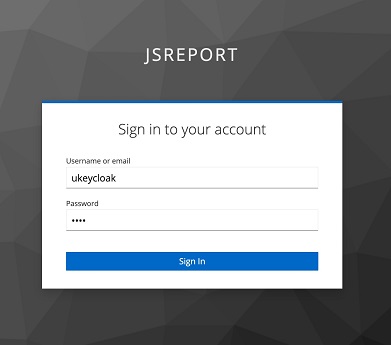
Now we start jsreport by running npm start, navigate to http://localhost:5488 and find the login page

Notice there is a new button LOGIN WITH KEYCLOAKSERVER, but for now we aren't going to use it. We need to create a jsreport user first before we can login in studio with Keycloak.
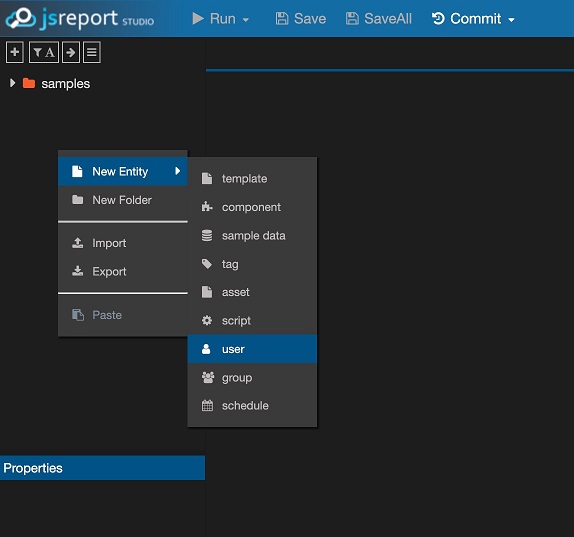
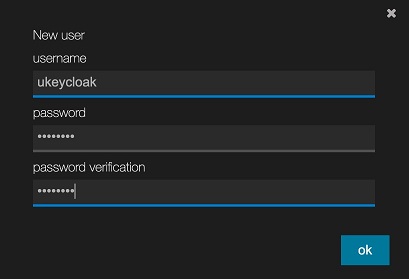
At the studio login page login with our jsreport admin user credentials (which by default are username: admin, password: password) and proceed to create a new jsreport user.
The new user should match the user created in Keycloak, so we are going to name it the same ukeycloak (it isn't needed to use the same password).
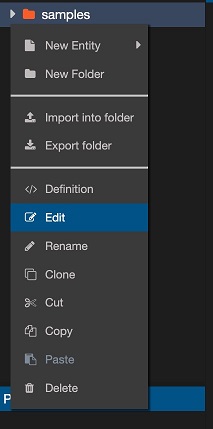
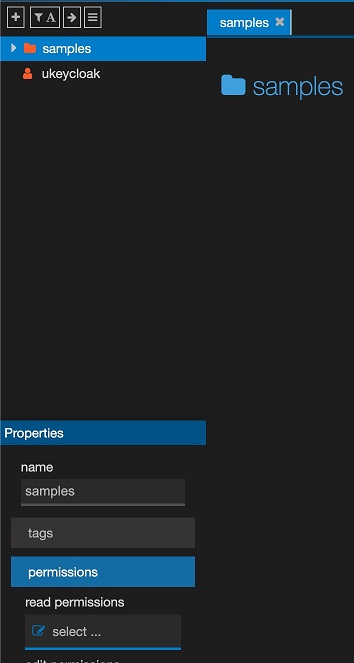
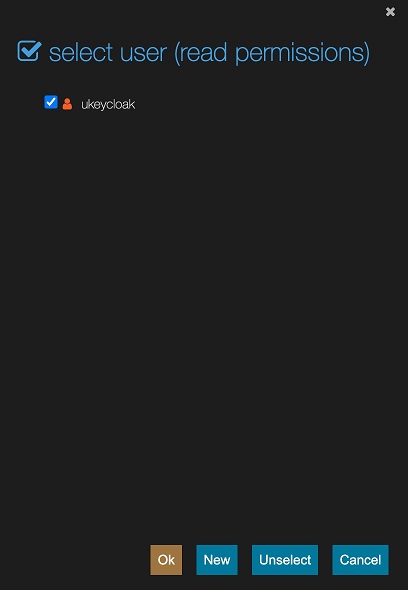
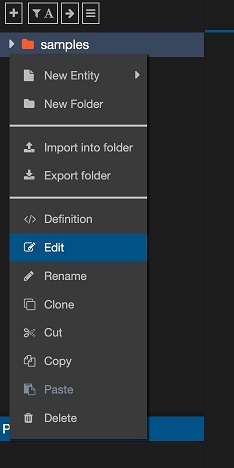
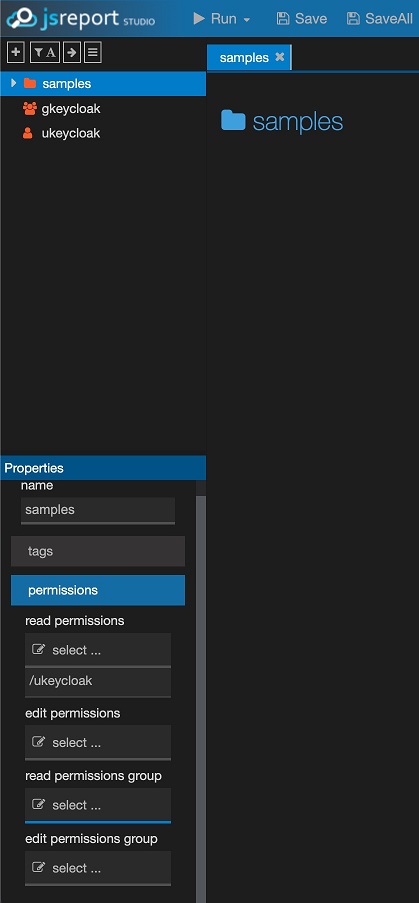
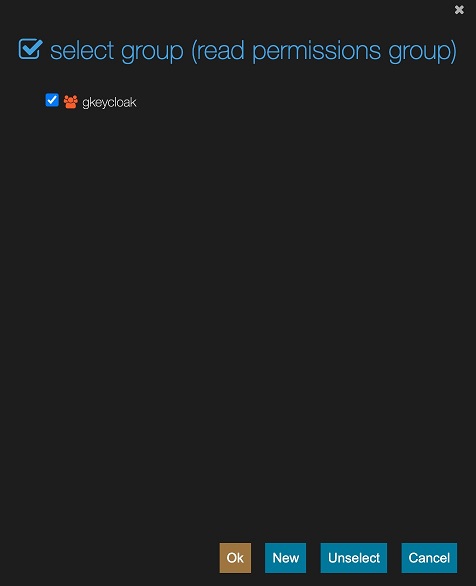
We are going to edit the permissions for the sample folder in the jsreport studio, in order the ukeycloak user to see entities there when its login passes.
Now we are ready to test the login in jsreport studio with Keycloak, but we first logout our current session.
We should see the jsreport studio login page now and click the LOGIN WITH KEYCLOAKSERVER button. Then we get redirected to the Keycloak login page where we enter the password for the ukeycloak user.
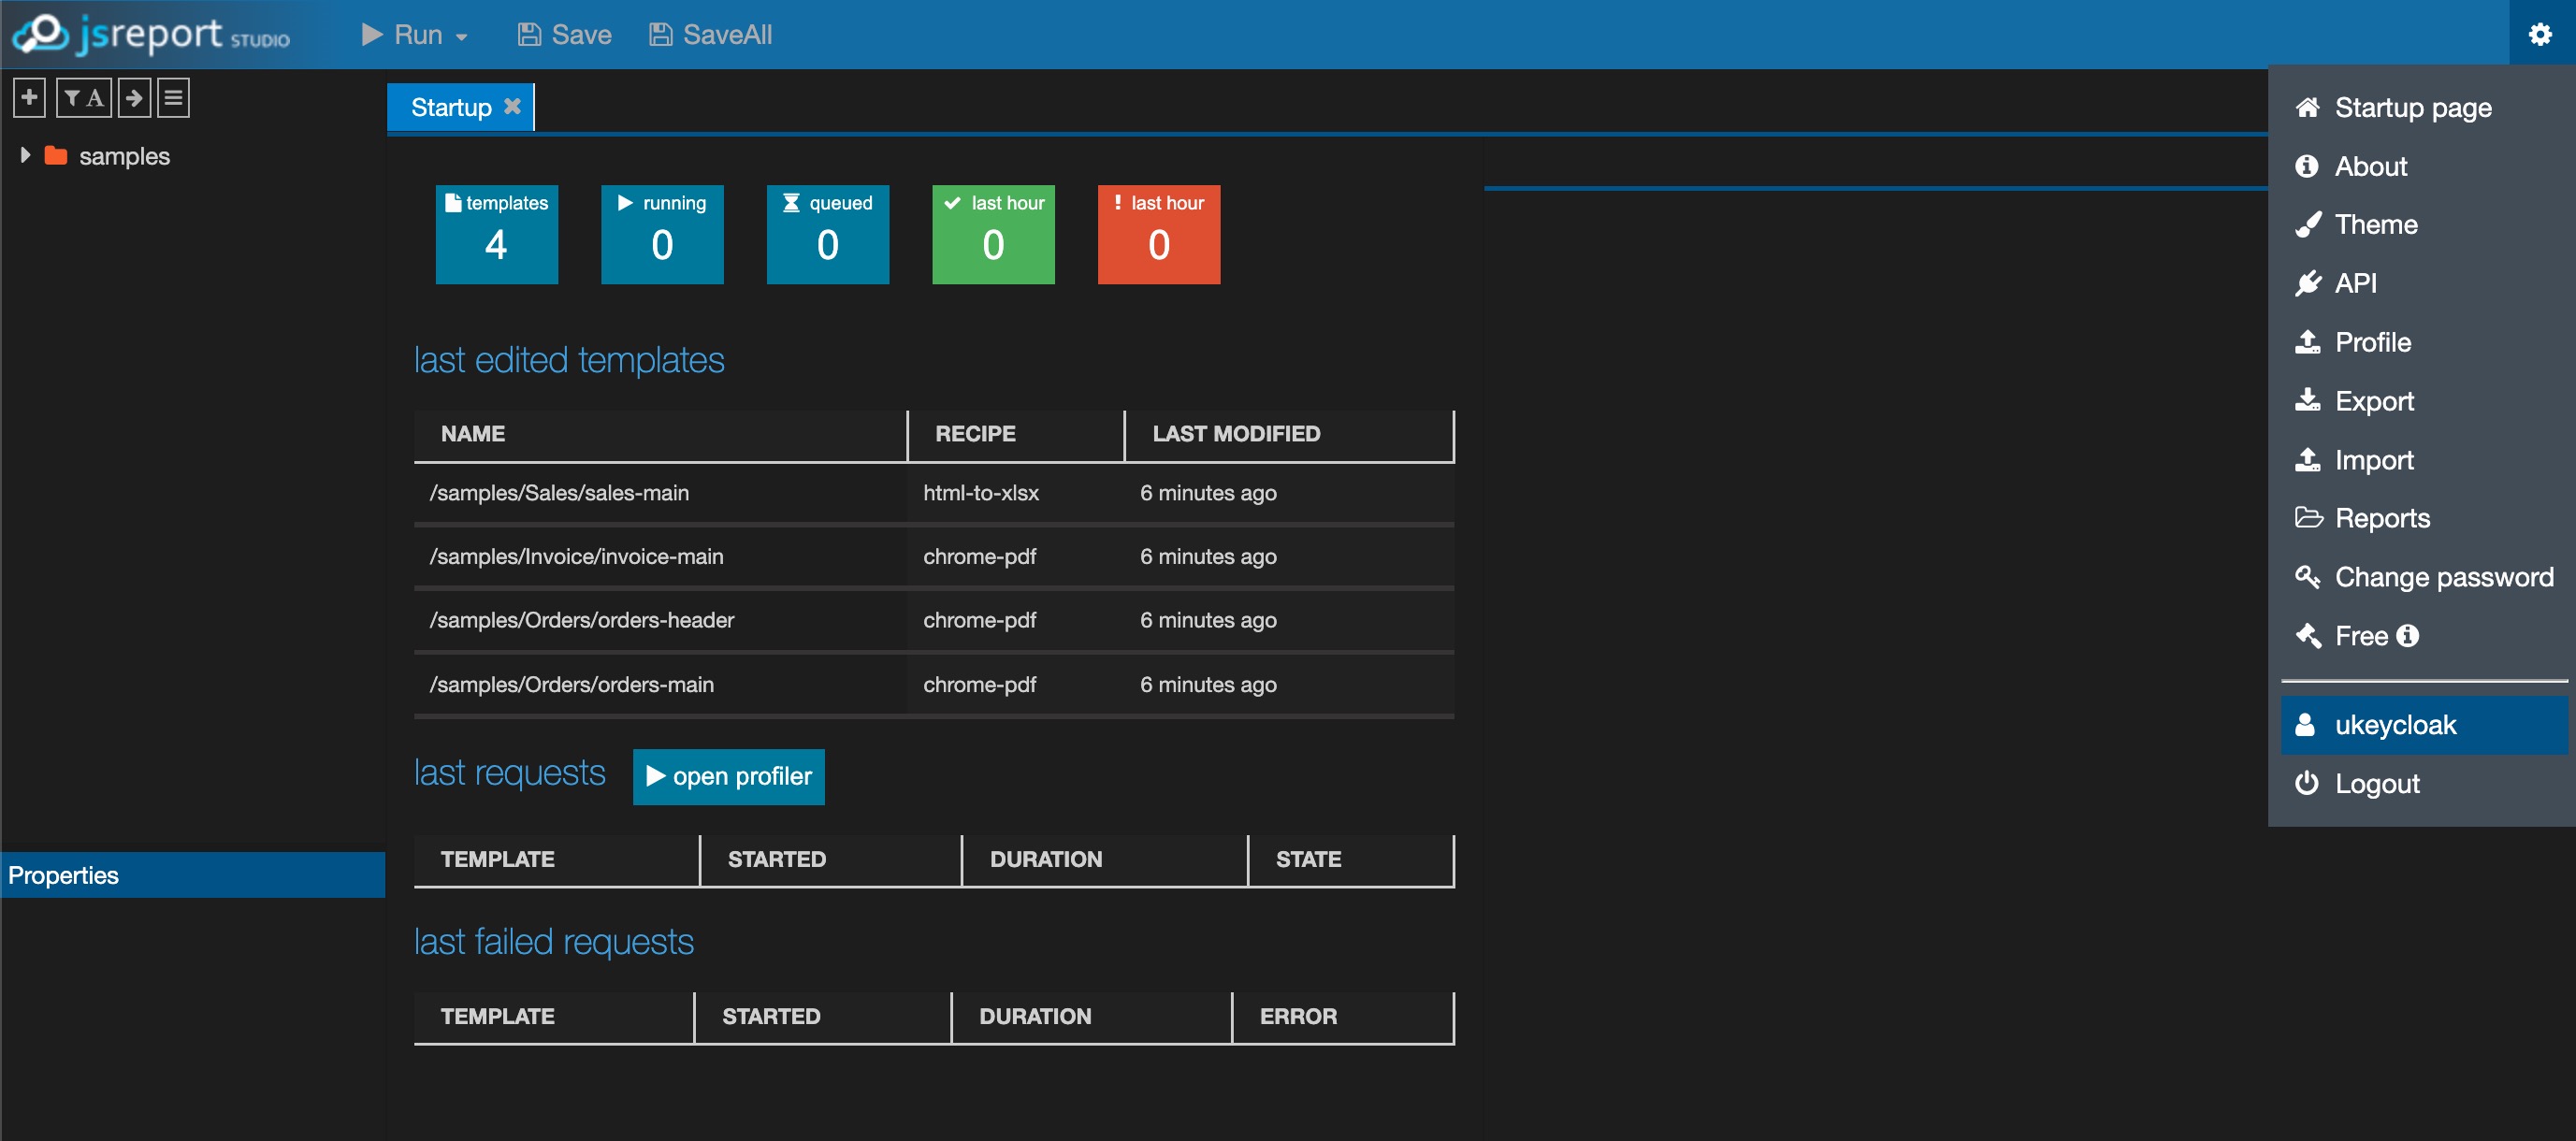
Finally we should now be logged in to the studio, and we should be able to see the samples folder.
Option 2: Associate a keycloak user to a jsreport group
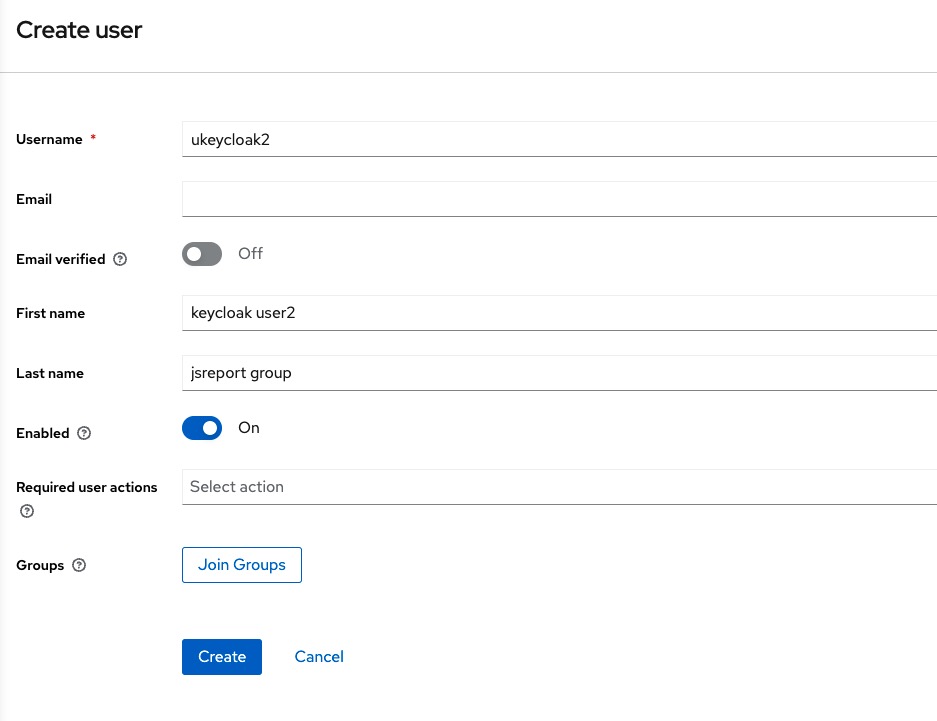
In the Keycloak Admin Console navigate to the Users section in the left side bar and click Add user.
There fill the following information and click Create:
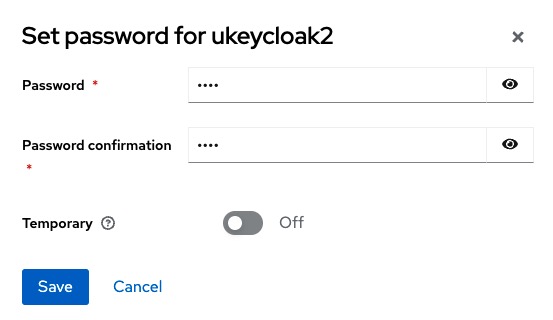
Click on the Credentials tab, click Set password and create a password for this user and click Save.
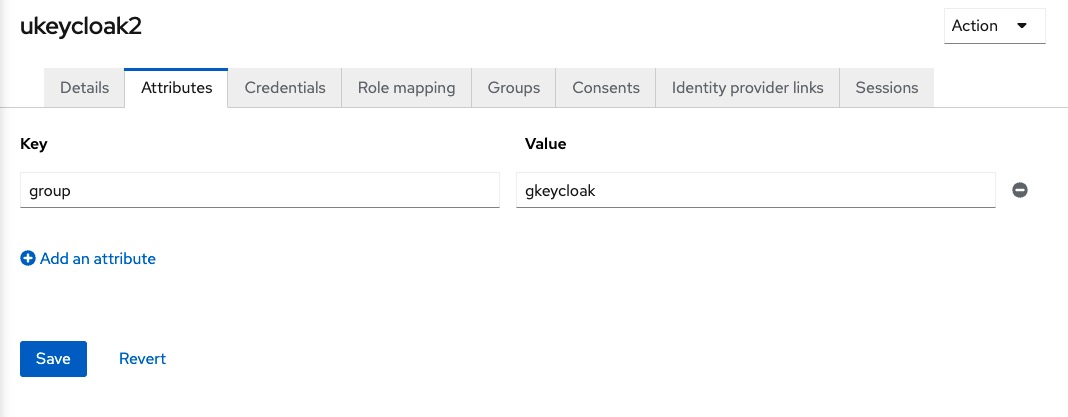
Then we click on the Attributes tab, and add a group key with the value gkeycloak and click Save.
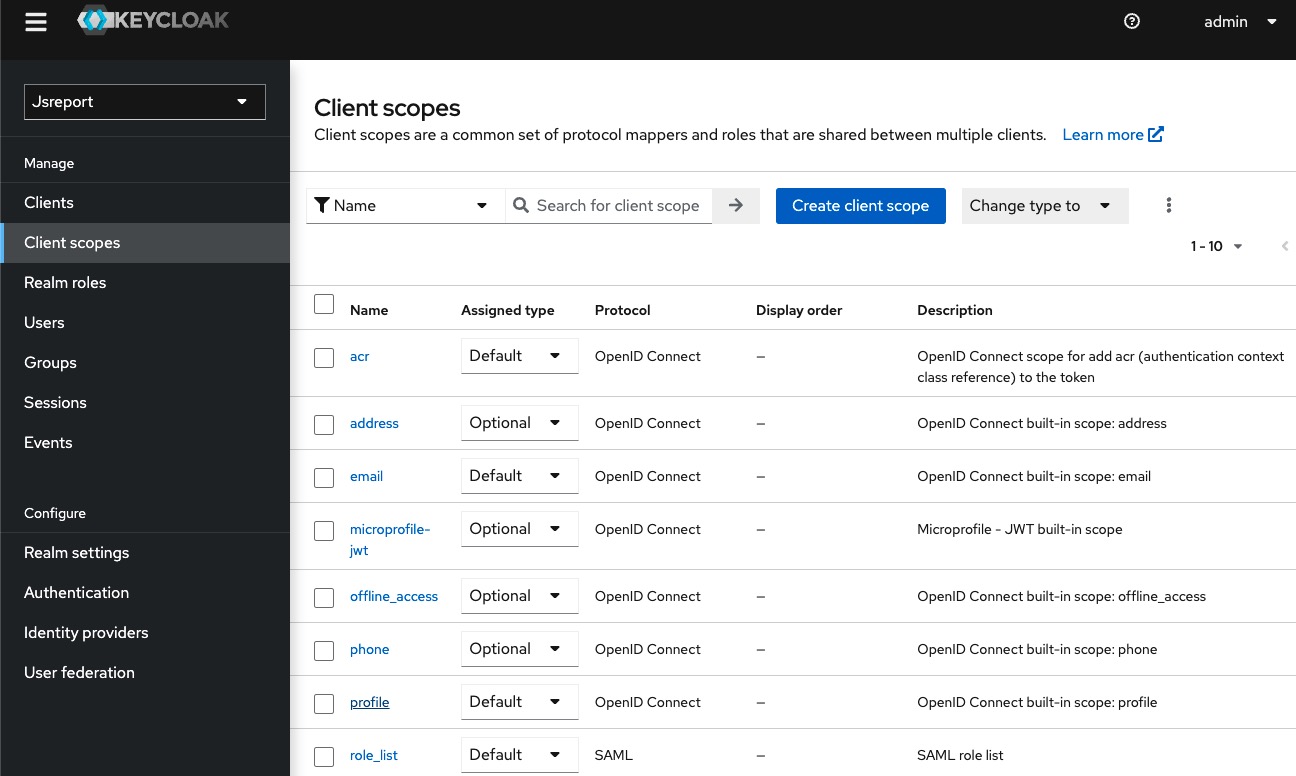
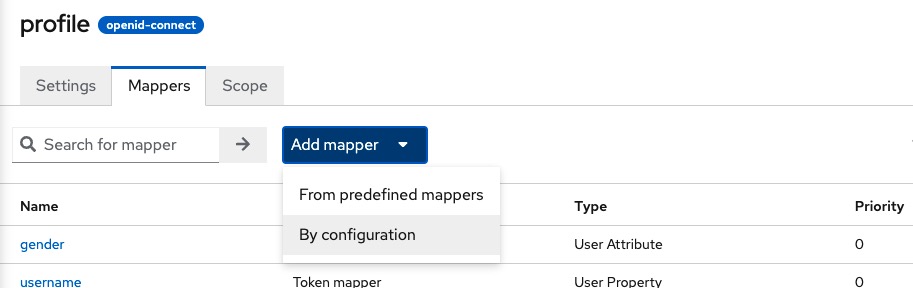
Go to the Client scopes in the left side bar and search for the profile item, and click it.
Click the Mappers tab and select the Add mapper, By configuration button.
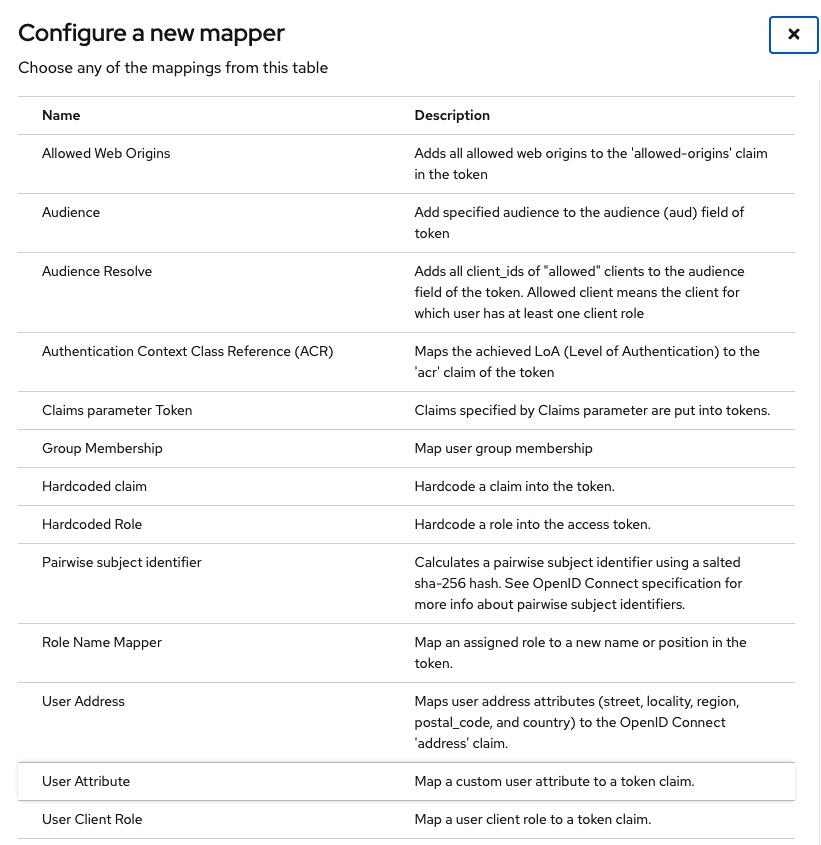
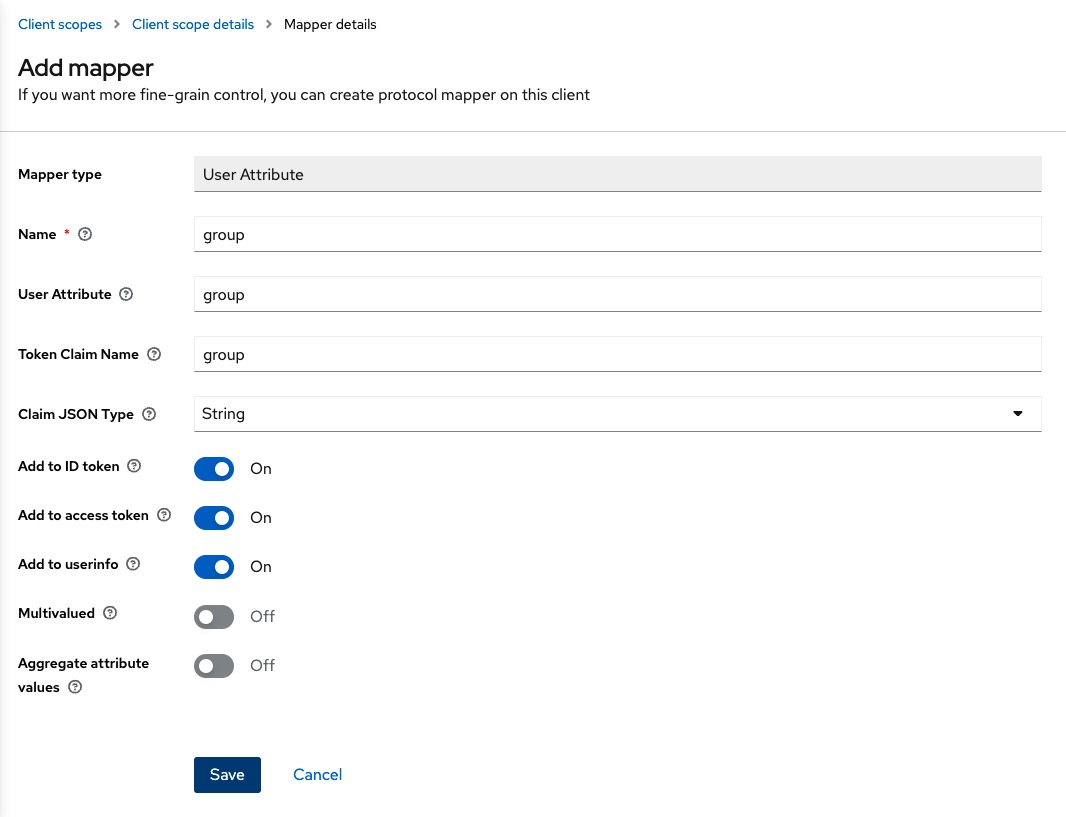
Choose User Attribute from the list and fill the following details and then click Save:
Now we navigate to the jsreport studio at http://localhost:5488. Ff there is an active session we should logout first. We need to create a jsreport group first before we can test the login with Keycloak for the group.
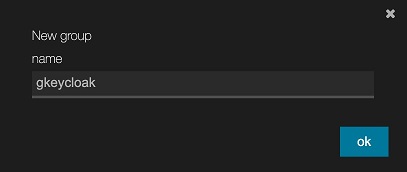
On the studio login page we login with our jsreport admin user credentials (which by default are username: admin, password: password) and proceed to create a new jsreport group.
The new group should match the group value we used in the attributes of ukeycloak2 user in Keycloak, so we are going to name it gkeycloak.
We are going to edit the group permissions for the sample folder in the jsreport studio. In order for the ukeycloak2 user to see entities there when its login passes.
Now again, we are ready to test the login in jsreport studio with Keycloak, but we first logout our current session.
On the jsreport studio login page, we click the LOGIN WITH KEYCLOAKSERVER button. Them we get redirected to the Keycloak login page, where we enter the password for the ukeycloak2 user.
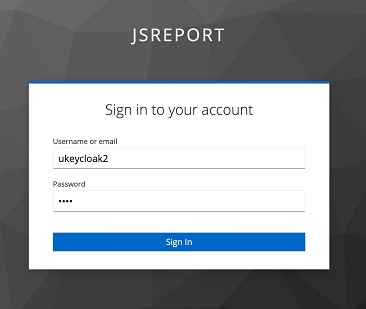
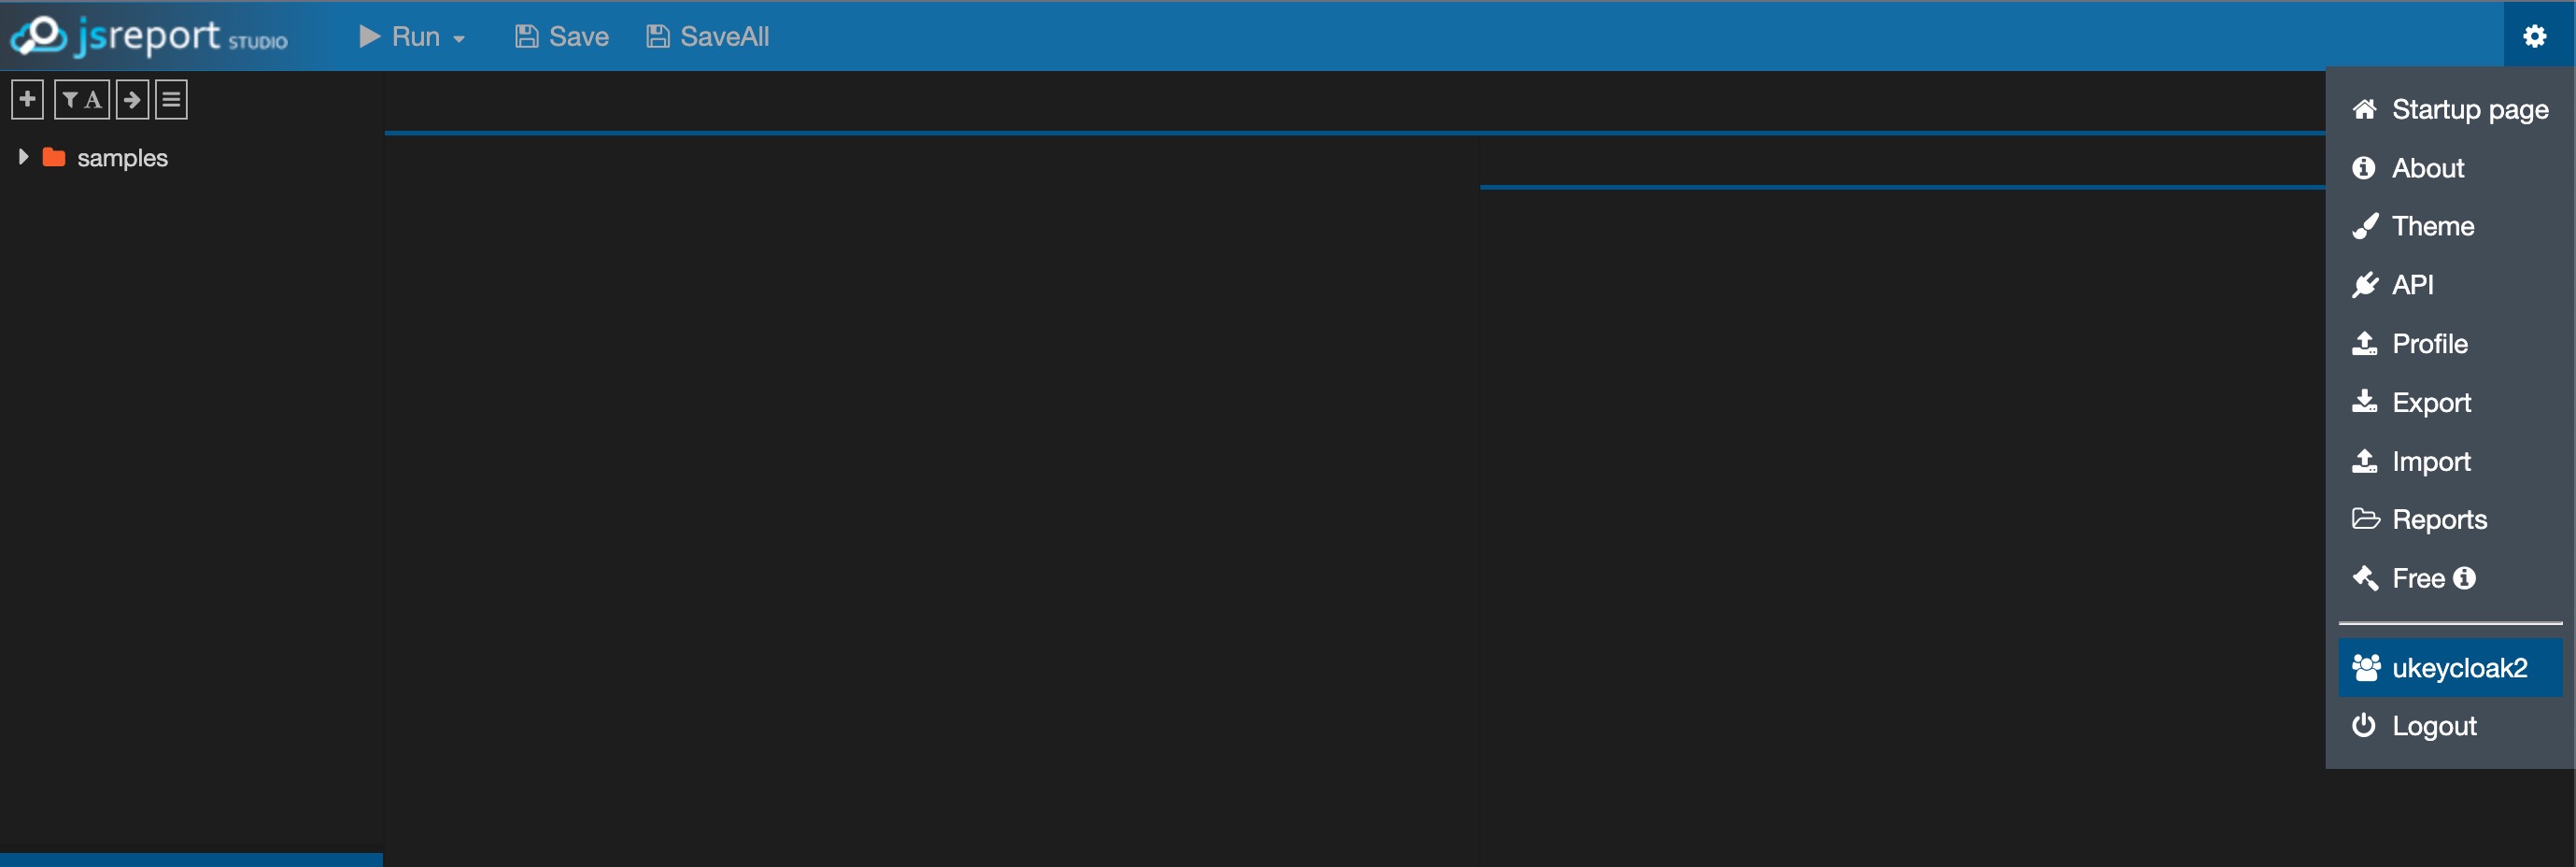
Finally, we should be logged in the studio now, and we should be able to see the samples folder.
Conclusion
Hope this post helps to understand better the two ways to integrate single sign on with jsreport. The source code for this post can be found here